• Skip to primary navigation
  • Skip to main content
  • Skip to primary sidebar

Sew Woodsy logo

  • DIY
  • Crafts
  • Cricut
  • Travel
  • About
menu icon
go to homepage
search icon
Homepage link
  • Home
  • Thanksgiving
  • DIY
  • Cricut
  • Travel
  • About Us
    • Email
    • Facebook
    • Instagram
    • Pinterest
    • Twitter
    • YouTube
  • ×

    Sew Woodsy » Project » Crafts

    Published: Feb 27, 2013 by Katie · This post may contain affiliate links.

    Birthday Paper Doily Tag

    Sharing is caring!

    0 shares
    • Facebook
    • Twitter

    Birthday Paper Doily Tag from SewWoodsy.com #12MonthsOfMartha

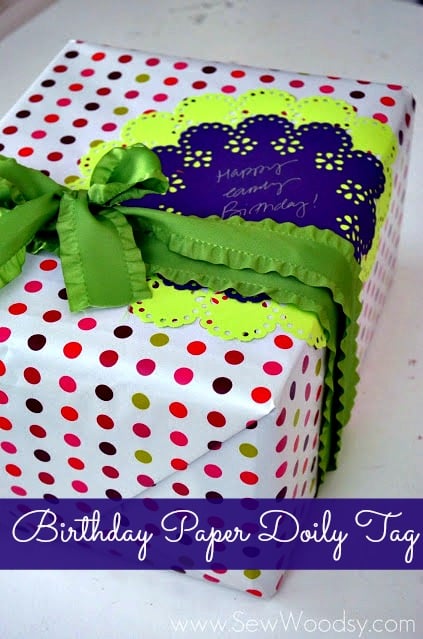
    Today is a very special day… it’s Mr. Woodsy’s birthday! We typically don’t exchange BIG birthday gifts and sometimes we don’t exchange any gifts at all. This year I decided to splurge and get Mr. Woodsy a GoPro camera. He has been eyeing that camera for years, and well I finally made his dreams come true. I wanted to give him the camera before our cruise (last week). It just so happened that the camera and accessories arrived at our mailbox last Monday, and I was off work. So operation pick up Mr. Woodsy’s birthday gift and surprise him was under way! I got the package, rushed home to wrap it, and then made this quick and easy Birthday Paper Doily Tag for the top of the package.

    Yesterday, I shared on how to use the Martha Stewart Crafts Circle Edge Punch Starter Set (and I’m also giving away one to one lucky reader). If you watched my video yesterday you know how easy it is to use this revolutionary circled edge punch! No cutting paper required… just set the size and punch! Within minutes you have a beautiful paper doily tag fit for any Birthday gift!

    Supplies:

    • Circle Edge Punch Starter Set
    • Paper
    • Spray Adhesive
    • Ribbon
    • Silver Pen

    Birthday Paper Doily Tag from SewWoodsy.com #12MonthsOfMartha

    Using the Circle Edge Punch begin to punch out an 8-inch doily.

    Birthday Paper Doily Tag from SewWoodsy.com #12MonthsOfMartha

    Continue punching out the 8-inch neon color paper. Then cut a 6-inch paper doily using the circle edge punch.

    Birthday Paper Doily Tag from SewWoodsy.com #12MonthsOfMartha

    Then, take your wrapped gift and 6-inch and 8-inch doily outside to use the spray adhesive. *Trust me–don’t ever use spray adhesive inside or near anything. EVERYTHING will get sticky!

    Birthday Paper Doily Tag from SewWoodsy.com #12MonthsOfMartha

    Adhere the 6-inch doily to the 8-inch doily. Then place it on the package to get an idea of how you want to place the doily on the package.

    Birthday Paper Doily Tag from SewWoodsy.com #12MonthsOfMartha

    Lightly spray the back of the 8-inch paper doily and then carefully stick the doily onto the package. Hold it down with pressure so that the doily bends.

    Birthday Paper Doily Tag from SewWoodsy.com #12MonthsOfMartha

    Then using a fancy pen write a message on the paper doily tag! Find your favorite piece of ribbon and wrap it around the box.

    Birthday Paper Doily Tag from SewWoodsy.com #12MonthsOfMartha

    And that’s it… that is how you make a quick and easy Birthday Paper Doily Tag for someone special in your life! And because everyone might be wondering what Mr. Woodsy thought of his gift…

    Mr. Woodsy opening his gift from SewWoodsy.com

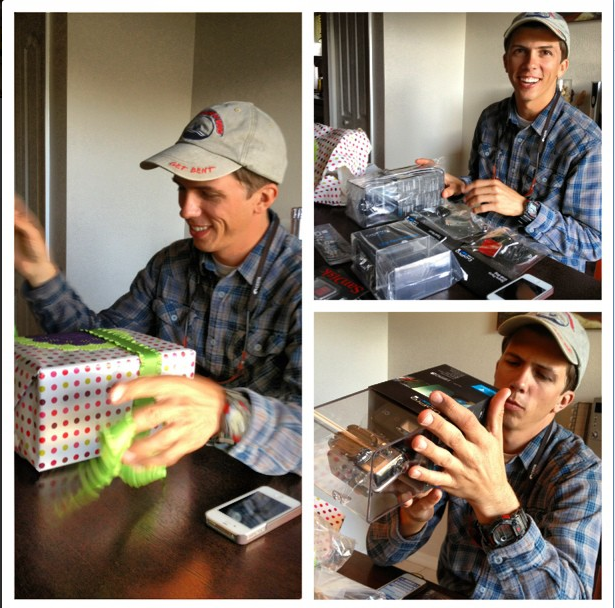
    Well, he was beyond surprised. I left the wrapped gift on the dining room table where he sits for dinner. When he got home I was in the other room. It took him a few minute to realized it was on the table. He asked what it was and I said “it came in the mail today”. It really did, I didn’t lie about that. Then he asked who it was for… well hmmm… there are only two of us in our home and my birthday isn’t for over a month. So I encouraged him to open it… and well. He was shocked and I’m pretty sure a tear came rolling down my cheek. I’m always an emotional mess whether happy or sad! lol. I cry at everything (I’ve always been like this).

    Disclaimer: I received craft products from Martha Stewart Crafts. I was required to blog about a project; however, I was not compensated. As always all opinions are my own. 

    « {Video & Giveaway} How to use Martha Stewart Crafts™ Circle Edge Punch Starter Set
    {Video} How to Make a Floating Shelf »

    Primary Sidebar

    • Email
    • Facebook
    • Instagram
    • Pinterest
    • Twitter
    • YouTube
    Male and female hugging on each other in the woods.

    Hi, we're Katie & Jon! Welcome to our home away from home!

    Sew Woodsy is a lifestyle blog focusing on crafts, home DIY projects, family, travel and all things life. Get comfy and join us on our adventure!

    More About Us →

    9 different logos from various media outlets where Sew Woodsy has been featured on.

    Easter Projects

    • Kids Easter Basket Ideas
    • 25 Easter Basket Ideas for Toddlers
    • Free Easter Coloring Pages
    • 17 Easter Craft Ideas

    Trending

    • How to Create a Natural Log Pathway + Video
    • Tips & Tricks on Installing Butcher Block Countertops
    • How to Host a Baby Shower at Work
    • How to Use Heat n Bond

    Male and female hugging on each other in the woods.

    Hi, we're Katie & Jon! Welcome to our home away from home!

    Sew Woodsy is a lifestyle blog focusing on crafts, home DIY projects, family, travel and all things life. Get comfy and join us on our adventure!

    More About Us →

    9 different logos from various media outlets where Sew Woodsy has been featured on.

    Easter Projects

    • DIY Follow the Bunny Pillow Cover
    • Bunny Kisses & Easter Wishes Burlap Garden Flag
    • Easter Bunny Family Pillow
    • DIY Easter Bunny Onesie with Name

    Trending

    • How to Create a Natural Log Pathway + Video
    • Tips & Tricks on Installing Butcher Block Countertops
    • How to Host a Baby Shower at Work
    • How to Use Heat n Bond

    Footer

    ↑ back to top

    9 different logos from various media outlets where Sew Woodsy has been featured on.

    About

    • About Us
    • Privacy Policy
    • Accessibility Statement

    Newsletter

    • Sign Up! for emails and updates

    Contact

    • Contact
    • Work with us
    • Advertise

    Copyright © 2010 - 2022 Sew Woodsy