• Skip to primary navigation
  • Skip to main content
  • Skip to primary sidebar

Sew Woodsy logo

  • Patriotic
  • DIY
  • Crafts
  • Cricut
  • Travel
  • About
menu icon
go to homepage
search icon
Homepage link
  • Home
  • Patriotic
  • DIY
  • Cricut
  • Travel
  • About Us
    • Email
    • Facebook
    • Instagram
    • Pinterest
    • RSS
    • Twitter
    • YouTube
  • ×

    Sew Woodsy » Project » Crafts

    Published: Sep 30, 2011 · Modified: Sep 26, 2012 by Katie · This post may contain affiliate links.

    {Tutorial} Fall Painted Table Runner

    Sharing is caring!

    297 shares
    • Facebook
    • Twitter

    I’ve been on a painting kick. Ever since receiving my big box of Martha Stewart Crafts™ premium acrylic paints I’ve been painting a lot more than I normally do! Actually, I take that back…. I’ve never painted this much in my life. I’m in love with this product. This paint has changed my crafting life! I wanted to make an inexpensive table runner for our always bare dinning room table. I’ve seen others use drop cloths and I felt that this would be the perfect material to make a table runner. Plus, by using a drop cloth I knew I would have more than enough material to work with for projects later on down the road. This project took me less than an hour to create, followed by 24 hours of drying, another 5 minutes or so of heat setting the fabric paint, and then I was off to decorate our table. I’m in love with how our table now looks. Perfect for fall!

    Supplies:

    • Drop Cloth, Scissors, Painters Tape, Parchment Paper
    • Sewing Machine, White Thread
    • Martha Stewart Crafts™ 2oz Multi-Surface Satin Acrylic Craft Paint – Carrot
    • Martha Stewart Crafts™ 6oz Tintable Fabric Medium
    • Martha Stewart Crafts™ Arabesque Laser-Cut Stencils
    • Martha Stewart Crafts™ Roller Tops

    First, lay down a long piece of parchment paper (or newspaper). You’ll want something to protect the bottom surface of which you will be working on. My paint went through the drop cloth and if I had not lined my project with a protective piece of paper it would have ruined my counter top surface.

    Iron the desired amount of drop cloth you’ll need for the project, and then proceed to hem the table runner with a sewing machine. I used the end of my drop cloth so I only needed to hem one side. However, after painting the drop cloth I realized how uneven the existing hem on the drop cloth was. You might want to hem all four edges yourself.

    Next, position your stencil where you want it to be. Secure it with a few pieces of painters tape. Now, prepare your paint mixture. You will want to mix 1 part medium to 2 parts paint. (Since my paint was half way finished I mixed everything in the existing bottle; however, if your project won’t require a full or half bottle of paint I suggest you mix it in one of the empty bottles that comes with the roller tops kit). Now, you can begin to carefully roll the paint on to the stencil.

    After you finish painting a section carefully move the stencil to match the pattern.
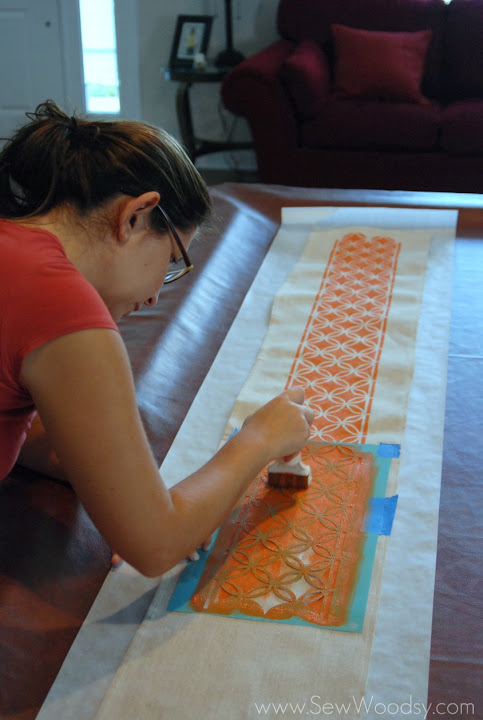
    … and paint some more. Make sure you are covering the fabric generously with paint. *And, yes, I’m painting this project on our pool table! It was the longest possible space that I could use and spread out. If you don’t have a pool table (or an extremely large table) you could always use the floor!

    I wanted to end the pattern the same way I started it. You’ll notice my stencil has overlapped one-third of the already painted fabric. That’s totally ok. The goal is to end where you begin. I also want to note how much I love the new roller tops. This makes painting stencils 100 times easier–glides easily and distributes paint evenly.
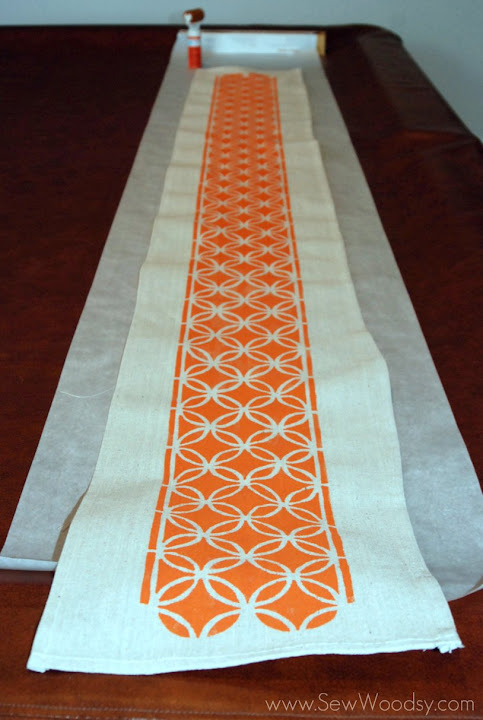
    Now, let your finished painted table runner rest for 24-hours.

    After your painted table runner has rested (and dried) for 24-hours you can heat set the fabric paint. I had never heard of heat setting until I was introduced to these paints. What heat setting does is make the paint permanent and washable. Using a piece of light weight fabric (like muslin as pictured) place it over the painted table runner. Place your iron (on high setting) on top of the muslin and keep on for 10-15 seconds. In fear of burning my projects I would keep the iron constantly moving; maintaining around 15 seconds on each area.

    Once your table runner has been heat set you may now place it on your table and begin to decorate!

    I think we are officially ready for fall in Florida!

    « Cutting Vinyl with a Cricut {Mini Tutorial}
    Zombie Planted Hands »

    Reader Interactions

    Comments

    1. [email protected] says

      September 30, 2011 at 9:19 am

      What a fabulous idea!
      Here is the blog post with your feature:

      http://morebangforyourbucks.blogspot.com/2011/09/few-of-my-favorite-things_30.html

      Blessings! Kelli

      Reply
    2. Heather says

      September 30, 2011 at 4:49 pm

      That turned out very nice!

      Reply
    3. Taryn @ Design, Dining + Diapers says

      September 30, 2011 at 5:42 pm

      I love this! It’s rustic and beautiful and so fall! Great job.

      Reply
      • Mrs. Woodsy aka Katie says

        October 01, 2011 at 5:24 pm

        Thanks Taryn, I love it too! At first I wasn’t sure how the actual product would turn out. So thankful it came out exactly how I imagined it.

        Reply
    4. Jessica says

      September 30, 2011 at 6:34 pm

      That is so cute, and such an easy project. I am definitely going to be buying some Martha Stewart paints.
      I am your newest follower and so excited to see what else you have to share.

      Reply
      • Mrs. Woodsy aka Katie says

        October 01, 2011 at 5:23 pm

        Glad you like it. Very easy project to complete within a day. I’m not a painter/stenciler and I can use these projects with ease! I’ve heard through the grapevine that the paints will be on sale within the coming weeks. Keep your eyes peeled on the Michael’s flyers!

        Reply
    5. Angela says

      September 30, 2011 at 8:40 pm

      Super Cute! I love it! 🙂

      Reply
    6. ColleenwithMurals&More says

      October 01, 2011 at 11:32 am

      Aaack!!! I LOVE it! I saw the thumbnail on Beneath My Heart and thought ‘Hey, that looks like my Martha stencil!’ lol. And it is! Of course, now I’ve gotta do one too 😀

      btw, I’m doing a 31 day blogging challenge w/Nester – Easy Holiday Paint Projects . . . and,yes, I’ll be using a lot of Martha’s stuff 😉

      Reply
      • Mrs. Woodsy aka Katie says

        October 01, 2011 at 5:18 pm

        LOL I know everyone has been using the Martha stencils–they are great! Can’t wait to see more of your paint projects!

        Reply
    7. Nicole @ Wonderful Joy Ahead says

      October 01, 2011 at 8:14 pm

      Here from TT&J. This project is one of the three projects that caught my eye in the link-up. Out of 800+ projects, that’s saying a lot! I love this use of the stencil, and it has my mind reeling to figure out how I could apply the dropcloth/stencil to my home. At this point, runners are out since my toddler would immediately pull it– and whatever is on it– off of the table.

      Reply
      • Mrs. Woodsy aka Katie says

        October 02, 2011 at 11:23 am

        Hi Nicole, thanks for visiting and the kind compliments! I’m glad you like my project. What about making pillows? I’m currently working on a set of festive holiday pillows that will actually be on TT&J later this month!

        Reply
    8. jen @ tatertots and jello says

      October 02, 2011 at 2:19 am

      It is so pretty! I love the pattern and color!! I featured it on my TT&J facebook page 🙂

      xoxox
      Jen

      Reply
      • Mrs. Woodsy aka Katie says

        October 02, 2011 at 11:20 am

        Thanks Jen! I’m so happy with how it turned out! Definitely a piece I’ll use year after year!

        Reply
    9. Brittany says

      October 03, 2011 at 1:04 am

      Beautiful! I found you through Flamingo Toes. Thanks for sharing!

      Reply
    10. Natasha @ 5 Minutes Just for Me says

      October 03, 2011 at 1:16 am

      We are just starting to see Martha Stewart products over here in Australia. They look great but I’m not sure I would be as talented as you in making something like this!

      Best wishes,
      Natasha.

      Reply
      • Mrs. Woodsy aka Katie says

        October 03, 2011 at 8:36 am

        Natasha–thanks for the kind comments! ANYONE can use these paints. This year was my first year using paint and stencils together. Trust me… you can do it girl!

        Reply
    11. Elizabeth says

      October 03, 2011 at 7:49 am

      Love this! Love the pattern, the color, the table . . . love everything about it!

      Reply
    12. Nicole @ Scrap Me Baby says

      October 03, 2011 at 9:49 am

      I love the color you used to stencil! It turned out really nice, and I think this stencil may go on my list!
      Found you at flamingo toes:)

      Reply
      • Mrs. Woodsy aka Katie says

        October 03, 2011 at 9:58 am

        Thanks! It’s called “carrot” and it’s in the matte family! All Martha Stewart Crafts Paints are 30% off this week at Michael’s!!!

        Reply
    13. Daneilia says

      October 03, 2011 at 11:54 am

      Your table runner looks great! Everything from the color you chose to the stencil 😉

      Reply
      • Mrs. Woodsy aka Katie says

        October 03, 2011 at 12:25 pm

        Thanks! I’m in love with it and so happy it didn’t take me weeks to make! 🙂

        Reply
    14. shauna says

      October 03, 2011 at 12:38 pm

      very cute idea! thanks for sharing!

      Reply
    15. Nikki says

      October 03, 2011 at 1:32 pm

      What an awesome stencil!! Your table runner came out perfect! Would love if you would stop by and share it at my linky party! http://everything-underthemoon.blogspot.com/2011/10/bedazzle-me-monday-2_02.html

      Have a great day!!

      Reply
      • Mrs. Woodsy aka Katie says

        October 03, 2011 at 2:01 pm

        Thanks. I just linked up!

        Reply
    16. Kim @ Twigs and Twirls says

      October 03, 2011 at 3:03 pm

      This looks great. I love the idea of the stencil. I definately need to try out Martha new stuff.

      Reply
      • Mrs. Woodsy aka Katie says

        October 03, 2011 at 4:04 pm

        Thanks Kim! Today only all Martha paints are 50% off! The paint tinter (which is needed for the fabric application will be 50% off tomorrow)!

        Reply
    17. Vivienne @ The V Spot says

      October 04, 2011 at 12:03 am

      This looks great! I love the pattern and the color is perfect!

      Reply
    18. Meredith Resnick From A Mother Seeking... says

      October 05, 2011 at 9:31 pm

      This came out so well. Maybe I need to try that roller… I never have such great luck with stencils.
      Thanks for the tutorial.
      ~ Meredith From A Mother Seeking Come find me on my blog, A Mother Seeking…

      Reply
      • Mrs. Woodsy aka Katie says

        October 06, 2011 at 12:13 pm

        I think the roller is key. I used a brush and sponge on my paint project before this one and it didn’t come out half as good as this one!

        Reply
    19. Jennifer Juniper says

      October 05, 2011 at 10:24 pm

      The possibilities for customizing this is endless! I love it!

      Reply
    20. [email protected] says

      October 06, 2011 at 4:08 pm

      so gorgeous! found you via HOH.

      hope you’ll visit me and my giveaway:
      http://hellolovelyinc.blogspot.com/2011/10/more-stencil-splendor-giveaway.html

      warmly.

      michele

      Reply
      • Mrs. Woodsy aka Katie says

        October 06, 2011 at 5:56 pm

        Thanks Michele! I’m heading over to your blog now!

        Reply
    21. [email protected] Decorating says

      October 06, 2011 at 4:42 pm

      Love this, Katie! I’m going to put it on my FB page and feature it next week! 🙂

      Reply
      • Mrs. Woodsy aka Katie says

        October 06, 2011 at 5:56 pm

        Thanks Nicole! I love it too! I’ll look out for the features! 🙂

        Reply
    22. Maureen Cavanaugh Berry says

      October 06, 2011 at 11:31 pm

      NIce work-I love that color, too. So clever. I’ll miss you in Nashville this weekend. Twitter #FBFNASH to follow.

      Reply
      • Mrs. Woodsy aka Katie says

        October 07, 2011 at 7:39 am

        Thanks Maureen! I’ll miss you ladies this weekend too. 🙁 Don’t worry I’ll be following the hash tag!

        Reply
    23. Heidi @ Show Some Decor says

      October 07, 2011 at 6:50 am

      What a wonderful project! I was just in Michaels yesterday and pondering these products– good to see a bit of what you can do with them. Thanks for sharing!
      Visiting from HOH~
      Heidi @ Show some Decor

      Reply
      • Mrs. Woodsy aka Katie says

        October 07, 2011 at 7:38 am

        The projects are endless with these awesome new paints. Thanks for stopping by!

        Reply
    24. Make handmade says

      October 07, 2011 at 8:33 pm

      Great tutorial! i love it, thanks for sharing

      Reply
    25. SJ @ Homemaker On A Dime says

      October 10, 2011 at 12:21 am

      Hi, there! You’ve got so much creativity and I’m admiring them all. May I invite you to join me, too, at my Creative Bloggers’ Party & Hop? Hope to see you there at the party 🙂

      Reply
      • Mrs. Woodsy aka Katie says

        October 10, 2011 at 7:09 am

        Thanks for the invite. I’ll run over their now and link up!

        Reply
    26. charisa says

      October 10, 2011 at 10:47 am

      This is great! Thanks for the inspiration!

      Reply
    27. Marie says

      October 10, 2011 at 3:46 pm

      LOVING this! So cute! Thanks so much for linking with us at Show & Share!

      Marie
      mylilpinkpocket.blogspot.com

      Reply
    28. [email protected] and Fabuless says

      October 12, 2011 at 6:06 pm

      This. Is. Amazing. Absolutely beautiful! I’ll be featuring this on tomorrow’s Thrifty Thursday Link Party. Thanks so much for linking this up 🙂

      Reply
      • Mrs. Woodsy aka Katie says

        October 12, 2011 at 9:23 pm

        Thanks! 🙂

        Reply
    29. Jamie says

      October 19, 2011 at 7:33 pm

      Love this! I have been doing a ton of stencils with my cricut lately. I linked up and I’m following you now 🙂

      I’d love it you come check out my blog sometime when you get the chance.

      [email protected]

      Reply
      • Mrs. Woodsy aka Katie says

        October 20, 2011 at 11:26 am

        I’m just starting to make cricut stencils! Heading over to your blog now…

        Reply
    30. Helen says

      October 28, 2011 at 12:54 pm

      This is breathtakingly beautiful!!! Thanks so much for sharing your creativity with those of us who are not as creative! I cant wait to make this!!!

      Reply

    Leave a Reply Cancel reply

    Your email address will not be published. Required fields are marked *

    Primary Sidebar

    • Facebook
    • Instagram
    • Pinterest
    • RSS
    • Twitter
    • YouTube
    Male and female hugging on each other in the woods.

    Hi, we're Katie & Jon! Welcome to our home away from home!

    Sew Woodsy is a lifestyle blog focusing on crafts, home DIY projects, family, travel and all things life. Get comfy and join us on our adventure!

    More About Us →

    Featured On

    9 different logos from various media outlets where Sew Woodsy has been featured on.

    Patriotic Projects

    • 30+ Patriotic Crafts
    • Patriotic Coloring Pages
    • “Home of the Brave” Patriotic Cake Topper
    • USA Mini Bunting Banner

    Trending

    • How To Grow Green Onions
    • How to Host a Baby Shower at Work
    • Tips & Tricks on Installing Butcher Block Countertops
    • How to Create a Natural Log Pathway + Video

    Footer

    ↑ back to top

    9 different logos from various media outlets where Sew Woodsy has been featured on.

    About

    • About Us
    • Privacy Policy
    • Accessibility Statement

    Newsletter

    • Sign Up! for emails and updates

    Contact

    • Contact
    • Work with us
    • Advertise

    Copyright © 2010 - 2022 Sew Woodsy