
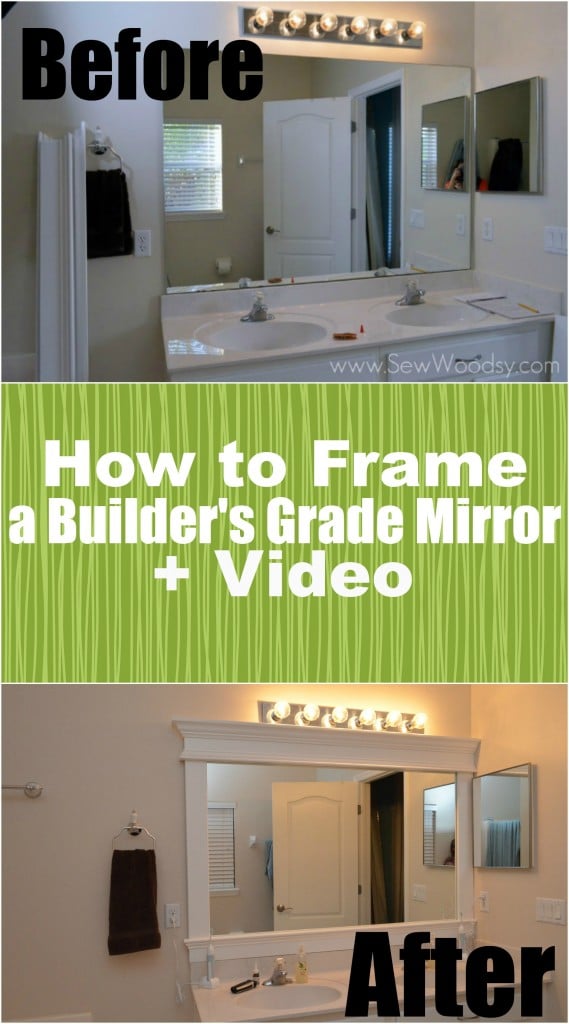
Most of us have them… those ugly and boring builder’s grade mirror. Very few of us actually do anything to jazz them up. We recently created a video over on the Homes.com blog: Frame a “Builder Grade” Mirror. This was a project that we had wanted to tackle for quite some time. You might remember, years ago when we first started blogging we shared our Guest Bathroom Mini-Makeover + Black Crown Molding. Instead of framing out that builder’s grade mirror we decided to remove it and place a nicely framed store-bought mirror. Well, in case you aren’t aware mirrors can get very pricey (I’m talking in the hundreds of dollars). Instead of spending hundreds of dollars on a new mirror we decided to spend about $50 and frame our builder’s grade mirror in our master bathroom.
Watch Jon (aka Mr. Woodsy) as he explains and shares how easy it really is to Frame a Builder’s Grade Mirror.
So now that you watched how to do it (easy right), let me show you a few behind the scenes photos.
First off, it all started on an early Saturday morning. Mr. Woodsy started removing the clips to the mirror that is when he noticed that the left side of the mirror (his side) was not sitting flush with the wall. Low and behold… what did we find behind our mirror???

A plug socket! I posted this collage on Instagram last month when we were working on the mirror!
That extra hidden plug socket gave us a big unexpected speed bump (we like to watch Amazing Race what can I say) that we weren’t ready for. So we brainstormed for a few hours on what to do. My friend Sarah from While They Snooze happened to come over that morning to pick up a chair that Jon found on the side of the road. (You know because that is what DIY friends are for… we find chairs on the side of the road and offer to give it to one another.) We consulted with Sarah on what to do as well and the three of us agreed that the socket needed to be moved. So off to the hardware store Jon went, and by the end of the day… we had a new plug socket. After 3.5 years of living in our home we find that we really should have had a “his and hers” plug socket in our bathroom.
So after the great-plug socket move of 2013 we got to work.

We finished cutting the moulding…

…and then on to painting.

And lastly glueing the moulding pieces together to get that custom look.

And then it was time to start framing the builder’s grade mirror.

Here is me behind the scenes… filming with a scared pup by my side. She’s not a fan of the bright lights and she sure as heck isn’t a fan of the loud noises.

And here was Jon… pushing the last piece of moulding onto the mirror!

Look at that gorgeous moulding… seriously. This framed builder’s grade mirror looks like it belongs in a different bathroom. The framed mirror has been up for over a month and I’m still head over-heals in love with it… now if only we could change out our builder’s grade lighting!

And well… what can we say–we now have two outlets in our bathroom. And because we like to keep it real–we still have pencil markings from when we installed the plug socket. Those will eventually get erased!
Disclosure: We have a working relationship with Homes.com and are video brand ambassadors for 2013 (thus we are compensated). As always all opinions are our own.
Comments & Reviews
Jessica says
Trying to frame my mirror and love the one you built but do you have a better picture of how you attached the pieces of trim to build it?
Katie says
Hi! This project was done years ago and at our old house. Unfortunately, these are the only photos I have. We used an adhesive glue that we placed on top of the frame that we then pushed onto the mirror. Hope that helps.
Shunda says
Hi Katie! You guys did a superb job on your mirror framing. Please keep up the good work. I have a question though, how was the framing secured to the wall and mirror?
Katie says
Hi Shunda, thank you so much. So sorry for the delayed response. We just used the adhesive on the frame and stuck it directly to the mirror. Our mirror was already secured to the wall. Hope that helps.
Phil Woods says
What is the name and type of Silicone you use? I am doing a similar project and was told Liquid Nails would damage the mirror?
Katie says
Hi Phil, we used construction adhesive for the mirror.
Jessica says
How did you paint the frame? Thinking of doing this project and I was thinking spray paint would be the best route.. but I saw where mdf is porous and would warp.. What did y’ll use? it looks clean and smooth in the pictures.. Thanks!
Katie says
We painted it with latex paint and a paint brush. or you can use a paint sprayer. I would be leery of spray paint because it can get too sticky and then over time dust will settle on it and it will be next to impossible to remove that from the painted frame without having to sand and repaint. Hope that helps.
barb says
i’m curious! I did this with a couple of my mirrors and used hot glue gun to hold the trim on but it sometimes like to fall off. what did you use to keep the trim attatched to the mirror?
Katie says
Hi Barb, if you watch our video we say exactly what we are using. I know for a fact it’s not hot glue!!! I want to say it was an adhesive in a tube found at Home Depot (or any local hardware store). Our mirror has not budged since we posted the video–looks professional and to be honest if the next owners want to remove it they will have to probably crack the mirror off the wall! 🙂
Stefanie says
Just curious how this has held up a year and a half later? We’re about to do ours in a few weeks and just curious if you have run into any issues with moisture, adhesion, etc? It looks GREAT!
Katie says
Stefanie, the mirror still looks great. No issues with moisture or adhesion! The next owners will have to rip out the wall to get the frame off! lol DO IT! You won’t regret it and it will make your bathroom look that much nicer! Email us a picture once your done so we can share with our readers!
Johnnie says
Great project Katie! I am so glad I got to see you face to face. You decorate a mean door 🙂
Katie says
Thanks Johnnie!!! I know I’m so glad we finally got to meet in person!
Diane Sykes says
What a beautiful, rich-looking finished mirror! Great makeover! Thanks for inspiring us to make our surroundings the best they can be 😉
Katie says
Thanks! It really is much easier than we ever thought it would be to revamp a boring mirror!
Katie says
The mirror looks even better in person! I can’t wait for you guys to see it in person!
Laura / The Shed blog by Pet Scribbles says
Yes please! Oh, I thought you asked if you could come over and do this to our bathroom mirrors too. I wish!!! Love this project, and am definitely saving it to show my husband after the SNAP conference occurs, of course! Thanks for such an awesome step by step! Your dog looks so sweet!
Katie says
Thanks Laura!Lol… super simple project. I know you and your hubby can complete this one without our physical help!
Gillian Luce says
Hey Katie! Nice video. Love that the camera lady even sported Homes.com’s color from behind the scenes! 😉 Btw, how crazy is it that you uncovered a plug behind your mirror? Seems like an odd place for the builder to have put it there, Keep up the great tutorials, really learning something over here in the Luce household. LOL.
Katie says
Thanks Gillian! I agree… a little crazy that we found a plug socket behind the mirror! Even in newer homes you never know what you will find! Thanks again for the continued support and partnership opportunities!
Sarah McKenna says
I love this project!!!!