• Skip to primary navigation
  • Skip to main content
  • Skip to primary sidebar

Sew Woodsy logo

  • Patriotic
  • DIY
  • Crafts
  • Cricut
  • Travel
  • About
menu icon
go to homepage
search icon
Homepage link
  • Home
  • Patriotic
  • DIY
  • Cricut
  • Travel
  • About Us
    • Email
    • Facebook
    • Instagram
    • Pinterest
    • RSS
    • Twitter
    • YouTube
  • ×

    Sew Woodsy » Sponsored

    Published: May 27, 2013 · Modified: Jun 23, 2013 by Katie · This post may contain affiliate links.

    {How to Build} Outdoor Fire Pit

    Sharing is caring!

    28 shares
    • Facebook
    • Twitter

    {How to Build} Outdoor Fire Pit via SewWoodsy.com for @Homes.com #diy #outdoor #video{How to Build} Outdoor Fire Pit via SewWoodsy.com for @Homes.com #diy #outdoor #video{How to Build} Outdoor Fire Pit via SewWoodsy.com for @Homes.com #diy #outdoor #video

    Happy Memorial Day! While we all honored those who have dedicated their lives for fighting for our freedom we wanted to share with you the outdoor fire pit we recently created. This is a fairly inexpensive project and only takes about a half day to complete! Not only does it add a lot of  characteristic to our backyard but it also will add a little more value to our home!

    Once again, we partnered with our friends over at Homes.com to create a video to share with the world on just how we created our Outdoor Fire Pit. Watch our video to learn just how easy it is to build an outdoor fire pit.

    So, what do you think? Pretty darn cool, right? I’m so glad we tackled this project even though I will be the first to admit that I was against building a permanent fire pit in our backyard.

    Here is the list of supplies in case you want to tackle this project and build a permanent outdoor fire pit in your backyard!

    Supplies:

    • Shovel/ Wheel Barrel
    • Crushed Concrete Rock (DO NOT USE RIVER ROCK)
    • 2×4 and Level
    • 12 inch Antique Natural Impression Flagstone Concrete Wall Block
    • Construction Adhesive
    • Rubber Mallet
    • Hammer

    {How to Build} Outdoor Fire Pit via SewWoodsy.com for @Homes.com #diy #outdoor #video

    Long story short. I bought Jon a metal fire pit years ago when we first moved in together. We had used it maybe two times during the two years we lived in our town-home. Fast forward to owning our home… I think we maybe used five times before it finally bit the dust. Last spring we used the metal fire pit once and then it never was moved back in to the garage. It sat all summer and fall outside; getting battered by the Florida afternoon rain-showers. We finally drained the water from the metal fire pit on new years eve. It was cold for a Florida night and we had our neighbors over to “toast” in the new year (ok, for drinks and an outdoor fire pit). Half way through our drinks, the fire fell from the metal pit and on to the grass. I may or may not have freaked out. Thankfully the fire did not spread and the next day we woke to a nice circular patch of grass missing thanks to the fire pit debacle of 2012/2013.

    {How to Build} Outdoor Fire Pit via SewWoodsy.com for @Homes.com #diy #outdoor #video

    Jon was sad to see his beloved metal fire pit go. He had talked about building an permanent stone fire pit for a while. So when we had the opportunity to build one for Homes.com we knew we were going to jump at the chance. Well, let me get this straight. He knew it and did a lot of convincing to get me on board. Once again… here I thought you just dig up the grass and pour the crushed concrete rock in the ground and put the flagstone blocks in a circle. Wrong! Jon is so dang meticulous. I have a love/hate relationship about this. I love it that he wants to do the best job ever, but I hate that it takes him forever! However, for this project I was shocked that it took us only a half day to complete!

    {How to Build} Outdoor Fire Pit via SewWoodsy.com for @Homes.com #diy #outdoor #video

    Our backyard has a slight slope, so this took a little longer for him to complete. By using an old 2 x 4 and a level he was able to make the fire pit level.

    {How to Build} Outdoor Fire Pit via SewWoodsy.com for @Homes.com #diy #outdoor #video

    And this is what it really looks like behind the scenes. Our hot tub was pulled apart since it sprung a leak while I was gone at SNAP! and all the water leaked out (but that is an entirely different post). All the dirt from the fire pit was put directly behind me.

    {How to Build} Outdoor Fire Pit via SewWoodsy.com for @Homes.com #diy #outdoor #video

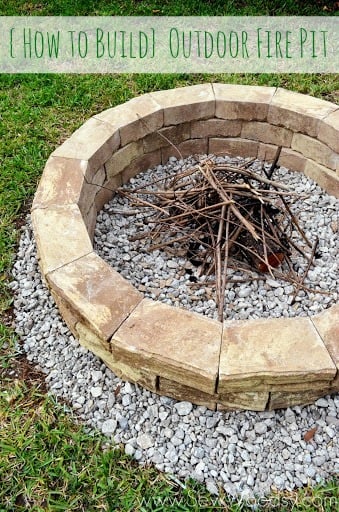
    And here you go… she was done just like that in all her glory! I love the detail from the flagstone!

    {How to Build} Outdoor Fire Pit via SewWoodsy.com for @Homes.com #diy #outdoor #video

    {How to Build} Outdoor Fire Pit via SewWoodsy.com for @Homes.com #diy #outdoor #video

    That night, Jon, had to make a fire to try out his latest project! Lucky for him, it just so happened to be a cool Florida evening (I say cool I am talking high 60’s low 70’s). The fire pit worked like a gem!

    So did we inspire you? Who else will be making a fire pit, soon?

    Linked up with Tatertots & Jello

    Disclosure: We have a working relationship with Homes.com and are video brand ambassadors for 2013 (thus we are compensated). As always all opinions are our own.

    « How to Build a Timber Garden Border + Vegetable Garden Tips
    {Video} How-to Install Crown Moulding »

    Reader Interactions

    Comments

    1. Sarah says

      May 28, 2013 at 10:44 am

      Looks great! Doing this at the next house!

      Reply
      • Katie says

        May 29, 2013 at 7:04 am

        Thanks Sarah! It’s really not that hard!!! This will be perfect at your next house!

        Reply
    2. Lauren @ The Thinking Closet says

      May 31, 2013 at 3:23 am

      Yay! We have a firepit in our backyard (it came with the house) and thanks to Mark’s initiation, we use it quite a fair bit (in the non-summer months that is). I love the look of how yours turned out. John really did such a great job making it level, sturdy, and good-lookin’, too.

      Reply
      • Katie says

        May 31, 2013 at 7:47 am

        Thanks Lauren! Some may find it odd to make a fire pit in Florida but it really does come in handy!

        Reply
    3. Jenn says

      June 03, 2013 at 1:17 am

      This looks great Katie!! This is one of our summer plans – thanks so much for the tutorial! How long did it end up taking to build?
      Jenn

      Reply
      • Katie says

        June 03, 2013 at 8:47 pm

        Thanks Jenn! Once all the supplies are gathered it took us about a half day from start to finish! So maybe 4-ish hours? Let me know if you guys build one!!

        Reply
    4. Destiny says

      June 03, 2013 at 9:20 pm

      LOVE this! I’m wanting to do one in our courtyard and this is a great how to Katie! Great job:0) Bookmarking and pinning!

      Reply
      • Katie says

        June 03, 2013 at 10:32 pm

        Thanks Destiny! I’m glad we had the opportunity to create it!

        Reply
    5. Andi says

      June 07, 2013 at 6:17 am

      I didn’t even know I wanted one of these until I saw your page! Thanks for the ‘how to’. I might have my summer project now. xx

      Reply
      • Katie says

        June 10, 2013 at 9:56 pm

        Thanks Andi! Seriously, it’s one of our best projects to date!

        Reply
    6. Brandi says

      June 10, 2013 at 12:43 am

      I love how this came together. My husband and I have wanted to do this in our yard for quite some time. Thanks for sharing the details.

      Reply
      • Katie says

        June 10, 2013 at 9:57 pm

        Brandi! Thanks for stopping by. Please share your final project if you end up making a fire pit!

        Reply
    7. Tami Bacigalupo says

      June 27, 2013 at 10:57 pm

      Great summer project for my son and I to “bond” over! We use our fire pit all the time and it’s on its last legs. Can’t wait to get started!

      Reply
      • Katie says

        June 28, 2013 at 4:49 pm

        Thanks Tami! If you guys make one please feel free to send photos I would love to share it with our readers!

        Reply
    8. Sarah says

      July 20, 2013 at 11:01 am

      Hi! Great project and accompanying video! What is the diameter of your pit and how did you come up with the needing to dig down about 6 inches…questions from my husband as we plan this project for tomorrow!

      Reply
      • Katie says

        July 22, 2013 at 8:25 pm

        Hi Sarah, sorry I’m just seeing this now. The digging down is to allow water to drain. The inside diameter is 45″ and the outside diameter is 5′. Good luck building it if you have any more questions feel free to e-mails us for a quicker response.

        Reply
    9. Corey says

      April 22, 2014 at 7:26 pm

      Just wondering about how many flagstones were used to create this fire pit?

      Reply
      • Corey says

        April 22, 2014 at 7:28 pm

        Could you please email me back with the info? I may forget to check back. Thanks

        Reply
      • Katie says

        April 25, 2014 at 12:03 pm

        Hi Corey, We used 48 flagstones. I believe though we did pick up a few extra in case we had any issues with the brick and then once the project was done we took back what we didn’t use.

        Reply
    10. Antoine says

      May 25, 2015 at 1:30 pm

      Great project, looks tidy and simple to put together.
      I am wondering about the fire-resistance of these bricks though, as well as the caulking, I’m really not sure it’s made to withstand high temperatures. Wouldn’t it just melt? Shouldn’t we use refractory bricks & mortar instead?

      Reply
      • Katie says

        May 26, 2015 at 9:49 am

        Hi Antoine, we’ve done a number of fire pit burns and have never had any issues. We also keep smaller fires and the fire never touches the bricks. You don’t have to do the caulking but it helps keep the place secure incase you have little ones near by that want to play by the fire pit (when no fire is present). You don’t have to worry about bricks following on them.

        Reply
    11. Jamie says

      July 07, 2015 at 3:36 am

      We really like this guys and will feature it over at ours this week. Will drop you a line when its up.

      Please, consider us if you have anything else you’d like to share or feature.

      Jamie

      Reply
    12. Cheri says

      November 06, 2015 at 11:23 am

      HI there,
      I really love outdo living and works. I found all your projects very interesting. I would like to know where did you buy those Natural Impression flagstone wall blocks. I found some in Home Depot, but they only sold me a few and they don’t sell antique colors anymore. Kindly please tell me where to get them besides Home depot? Thanks and have a great day

      Reply
      • Katie says

        November 06, 2015 at 8:10 pm

        Hi Cheri–thank you for taking the time to leave a comment. We bought them at The Home Depot a few years ago. Maybe try Lowes or a brick paver place that would sell flagstone. Good luck!

        Reply
    13. healthy meals planned for the days says

      May 18, 2017 at 6:41 am

      This is one of our summer plans – thanks so much for the tutorial! How long did it end up taking to build?

      Reply
      • Katie says

        June 09, 2017 at 10:51 am

        It will probably take 2-3 hours tops. It took us all day since we had to film and take photos in between! 😉

        Reply
    14. Caroline says

      October 10, 2017 at 6:03 am

      Ohhh That’s a wonderful thing for my house in the future.

      Reply
    15. Jake Miller says

      May 06, 2020 at 6:54 pm

      I would say that this was a perfect tutorial. Thank you for letting us know that it was not that complicated to build a fire pit.

      Reply
      • Katie says

        May 06, 2020 at 8:12 pm

        Thanks Jake! Glad you found it helpful!

        Reply

    Leave a Reply Cancel reply

    Your email address will not be published. Required fields are marked *

    Primary Sidebar

    • Facebook
    • Instagram
    • Pinterest
    • RSS
    • Twitter
    • YouTube
    Male and female hugging on each other in the woods.

    Hi, we're Katie & Jon! Welcome to our home away from home!

    Sew Woodsy is a lifestyle blog focusing on crafts, home DIY projects, family, travel and all things life. Get comfy and join us on our adventure!

    More About Us →

    Featured On

    9 different logos from various media outlets where Sew Woodsy has been featured on.

    Patriotic Projects

    • 30+ Patriotic Crafts
    • Patriotic Coloring Pages
    • “Home of the Brave” Patriotic Cake Topper
    • USA Mini Bunting Banner

    Trending

    • How To Grow Green Onions
    • How to Host a Baby Shower at Work
    • Tips & Tricks on Installing Butcher Block Countertops
    • How to Create a Natural Log Pathway + Video

    Footer

    ↑ back to top

    9 different logos from various media outlets where Sew Woodsy has been featured on.

    About

    • About Us
    • Privacy Policy
    • Accessibility Statement

    Newsletter

    • Sign Up! for emails and updates

    Contact

    • Contact
    • Work with us
    • Advertise

    Copyright © 2010 - 2022 Sew Woodsy