Looking to spruce up your garden? My DIY Garden Edging is the perfect way to elevate your outdoor oasis with a timber garden boarder.

We love to garden! Some wonder how we find the time since we are so busy. With a few tips and tricks gardening can be done with little-to-no work! Promise! I think the ultimate thing you need to do is figure out what inspires you in the garden. Gardening does not have to be complicated if you have fun garden projects! Another thing to keep in mind is the dreaded word “weeds”. If you can get them under control you can garden my friend! Today we are excited to share with you our DIY Garden Edging plus we want to give you our own vegetable garden tips and tricks (scroll down to the end for those).

We want to share with you what we have been working on in our garden over the past few weeks. I say over the past few weeks because we are now in rainy season in Florida and every night after we get home from work the skies decide to open and we are stuck inside. Since building our raised garden beds the other year we have always dealt with fire ants and other bugs… and the fact that I hate grass touching my legs! So we came up with a brilliant idea (I say we… really we all know it was Jon who came up with the amazing idea). Why not remove all the grass, add some mulch, and timbers to box in the area!?!? Above you’ll see what our garden looked like before the big transformation.
Table of contents
Supplies
- Shovel
- Wheel barrel
- Mulch
- Timbers
- Chop Saw
- Rebar
- Drill
- 7/8″ Fostner bit
- Hammer
Directions
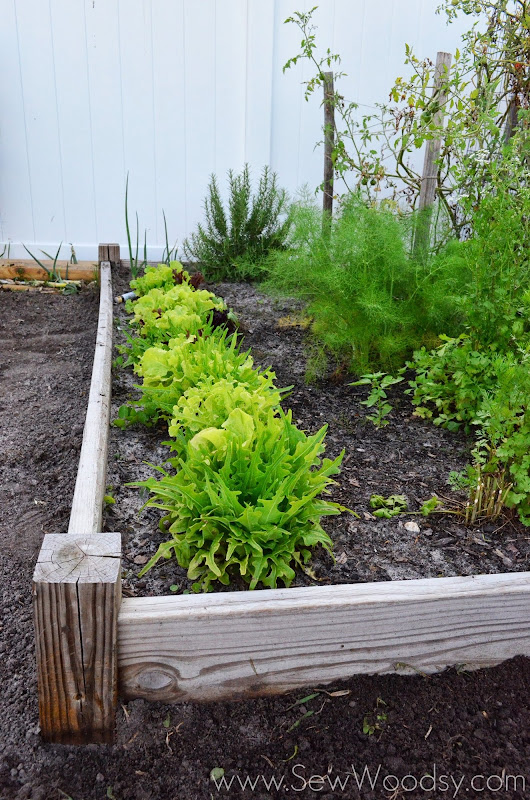
We started by cleaning up our garden! Our spring mixed looked beautiful but due to the extremely warm weather the leaves began to turn bitter. This is what happens with lettuce when grown in a very warm climate. So Sadly, we had to remove the lettuce we had been munching on for the past few months. Did you know that you just cut the spring mix from the bottom and it regenerates in just a few days? I swear I haven’t bought salad in months! It was such a nice treat!

We also picked the last of our cherry tomatoes (they filled an entire big bowl and the pitcher as seen above).

To make room for the new crop we slowly started to remove our beloved and very rogue cherry tomato bush! This beautiful tomato plant popped up out of no where and yielded us hundreds of beautiful and plump cherry tomatoes. It was slowly starting to get eaten alive by all the bugs and it was nearing its end. It was looking very “stickly”… and yes that is a word!

Tomato & other garden debris.

After the garden was cleaned up, Jon started to remove the grass from around the raised garden beds.

While Jon worked on that I began adding new soil to our garden! We had bags and bags of Miracle-Gro soil waiting for me to add it to our garden!

Working in the garden is new for me! But I enjoy it and know that I only need to spend a little bit of time to make a big impact! I did not grow up gardening nor did I have a green thumb. In my opinion, Miracle-Gro has helped me succeed at gardening. We love their products and use them all the time on our garden. Remember, that’s my opinion… not a claim!

After finishing removing all the grass it was time to get building the border around our garden!

With a 90-degree ruler you’ll want to mark the edges of your timbers to create 90 degree angles that will but together.

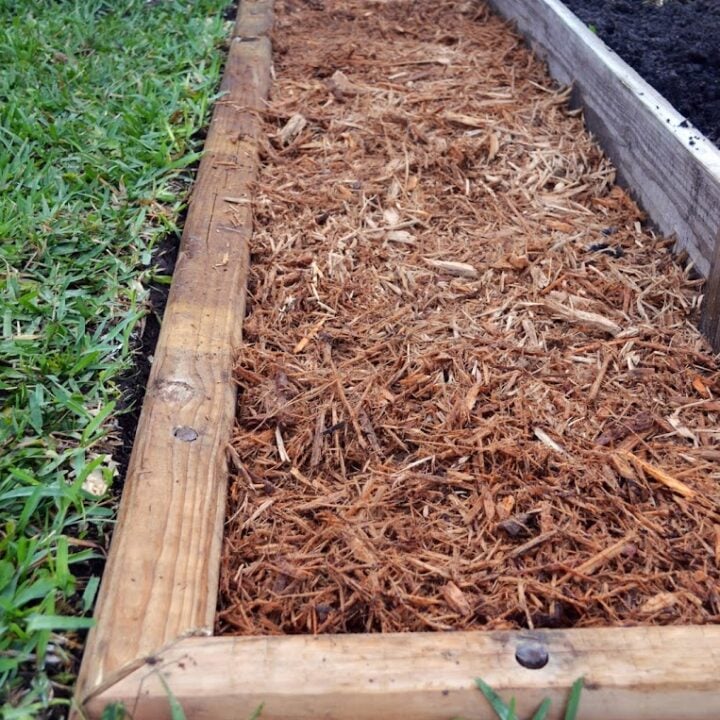
Cut the wood timbers to size. You’ll notice that the edges fit together like a picture frame! This gives it a much more polished look.

Place the wood timbers in the patter of your choosing. Then using a drill with a 7/8″ Fostner bit drill a hole all the way through the timber.

Next, cut rebar to be 1-foot long. This will help secure your wood timbers. Then place the rebar in the drilled hole.

Using a hammer, hammer the rebar in the ground.

Make it flush with the wood timbers.

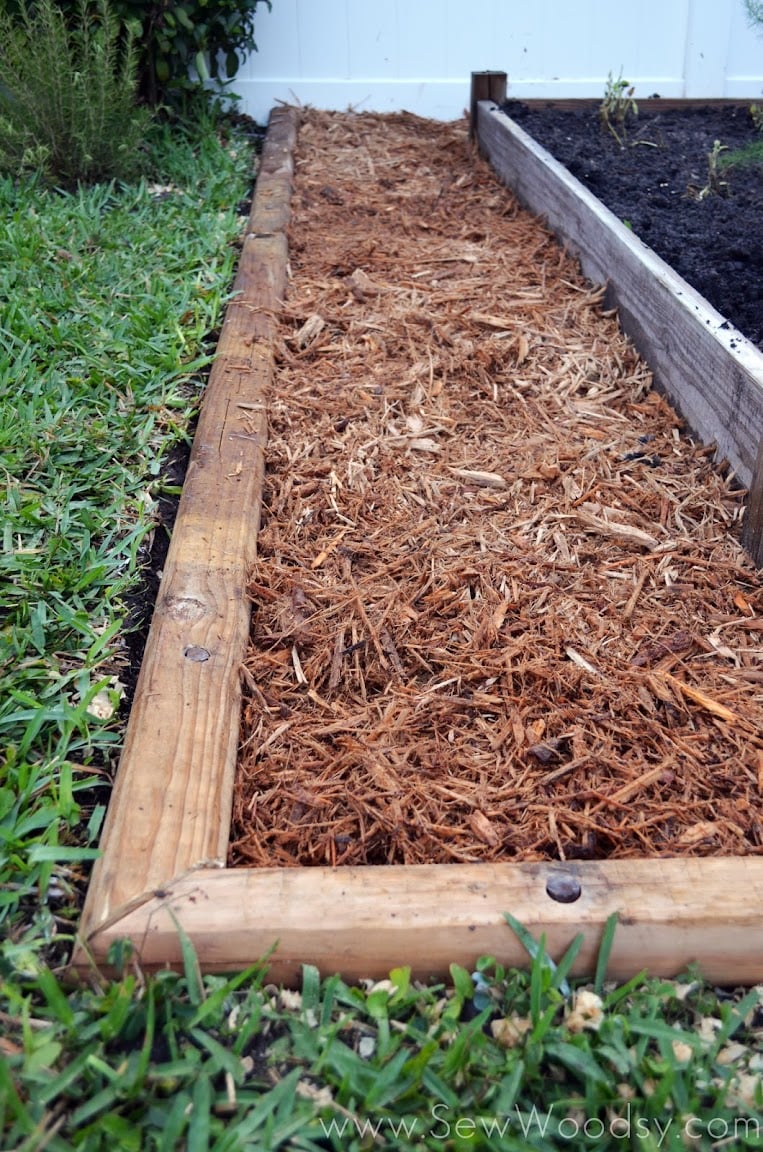
Lastly, place mulch in between the timber garden border and around your raised garden beds!

Voila! Your finished! Now you can have a nice walkway around the garden beds!

Take a look at the gorgeous transformation with the before and after! What do you think about our newly revamped garden bed? Since my mom has been in the hospital over the past few days I came home to our timber garden border being complete the other day. Seriously, Jon knocked this out of the park. I don’t know what I would do with out him. I’m smitten for how our garden looks!
I love our new timber garden border and enjoy walking around the garden now without being bit by fire ants and without any grass touching my legs!
FAQs
You’ll need timber planks or logs, a saw, hammer, nails or screws, a level, measuring tape, and optionally, landscaping fabric and gravel.
Aim for a depth of at least 6 inches to ensure stability.
Pressure-treated wood is a good choice for durability, especially if it will be in contact with soil. Cedar and redwood are naturally rot-resistant options if you prefer a more natural look.
This depends on personal preference and the purpose of the border. Typically, borders range from 6 inches to 1 foot in height.
It’s a good idea to apply a wood preservative or sealant to protect the timber from rotting over time.
Installing landscaping fabric underneath the border can help prevent weeds from growing up through the soil.
Screws provide more stability and are less likely to loosen over time compared to nails.
Tips and Tricks
By following these tips and tricks, you can create a beautiful and functional timber garden border that enhances the overall look of your outdoor space.
- Plan your design: Before you start building, sketch out your garden border design and measure the dimensions of your garden bed.
- Choose quality timber: Invest in high-quality timber that will withstand weathering and last longer.
- Level the ground: Ensure the ground where you’ll be placing the timber border is level to prevent any unevenness.
- Use a mallet: A rubber mallet can be handy for tapping the timber into place and ensuring a snug fit.
- Pre-drill holes: To prevent splitting, pre-drill holes in the timber before driving in screws or nails.
- Stagger joints: If you’re using multiple timber pieces to create a longer border, stagger the joints to add stability and visual interest.
- Consider drainage: Make sure water can drain away from the garden bed to prevent waterlogging, especially if you’re using timber that’s in direct contact with soil.
- Maintenance: Regularly inspect the timber border for any signs of damage or wear, and treat or replace as needed to ensure longevity.
Vegetable Garden Tips & Tricks
If your thinking of starting a vegetable garden here are a few things to consider:
- Research to see what grows best in your climate.
- Start with “easy” vegetables and herbs to begin growing; think tomatoes, peppers, and jalapenos.
- Think about where you will plant your garden.
- If you have a small space maybe a container garden is best.
- If you have a little bit of land maybe a raised garden bed is best?
- If you have acres you could have yourself a mini farm!
- Water consistently at the same time each day!
- Feed your plants food (we like to use the LiquaFeed All Purpose Plant Food Advance Starter Kit) to help them grow strong and bountiful!
DIY Garden Edging
Looking to spruce up your garden? My DIY Garden Edging is the perfect way to elevate your outdoor oasis with a timber garden boarder.
Materials
- Mulch
Tools
- Shovel
- Wheel barrel
- Timbers
- Chop Saw
- Rebar
- Drill
- ⅞″ Fostner bit
- Hammer
Instructions
- Start by making sure your garden is clean. Make room for your border by removing anything that can be in the way.
- After your garden is cleaned up, remove the grass from around the raised garden beds.
- Begin adding new soil to your garden.
- After finishing removing all the grass prepare to start building the border around our garden.
- With a 90-degree ruler, you’ll want to mark the edges of your timbers to create 90-degree angles that will put them together.
- Cut the wood timbers to size. Notice that the edges fit together like a picture frame. This gives it a much more polished look.
- Place the wood timbers in the pattern of your choosing.
- Drill with a ⅞″ Fostner bit drills a hole all the way through the timber.
- Next, cut the rebar to be 1 foot long. This will help secure your wood timbers.
- Then place the rebar in the drilled hole. Using a hammer, hammer the rebar into the ground. Make it flush with the wood timbers.
- Lastly, place mulch in between the timber garden border and around your raised garden beds.
- Now, enjoy the nice walkway around the garden beds.
Notes
- Plan your design: Before you start building, sketch out your garden border design and measure the dimensions of your garden bed.
- Choose quality timber: Invest in high-quality timber that will withstand weathering and last longer.
- Level the ground: Ensure the ground where you'll be placing the timber border is level to prevent any unevenness.
- Use a mallet: A rubber mallet can be handy for tapping the timber into place and ensuring a snug fit.
- Pre-drill holes: To prevent splitting, pre-drill holes in the timber before driving in screws or nails.
- Stagger joints: If you're using multiple timber pieces to create a longer border, stagger the joints to add stability and visual interest.
- Consider drainage: Make sure water can drain away from the garden bed to prevent waterlogging, especially if you're using timber that's in direct contact with soil.
- Maintenance: Regularly inspect the timber border for any signs of damage or wear, and treat or replace as needed to ensure longevity.
Recommended Products
As an Amazon Associate and member of other affiliate programs, I earn from qualifying purchases.

If you make these DIY Garden Edging, I would be honored and love for you to take the time to leave a star rating and comment! I spend hours developing and testing these projects, and always love to hear feedback and user experience!
Don’t forget to FOLLOW ME on Facebook, Pinterest, and Instagram, and subscribe to my email lis
