• Skip to primary navigation
  • Skip to main content
  • Skip to primary sidebar

Sew Woodsy logo

  • DIY
  • Crafts
  • Cricut
  • Travel
  • About
menu icon
go to homepage
search icon
Homepage link
  • Home
  • Thanksgiving
  • DIY
  • Cricut
  • Travel
  • About Us
    • Email
    • Facebook
    • Instagram
    • Pinterest
    • Twitter
    • YouTube
  • ×

    Sew Woodsy » Popular

    Published: Nov 12, 2012 · Modified: Jun 22, 2021 by Katie · This post may contain affiliate links.

    Recovering the Ikea Tullsta Chair

    Sharing is caring!

    1717 shares
    • Facebook170
    • Twitter

    Recovering the Ikea Tullsta Chair

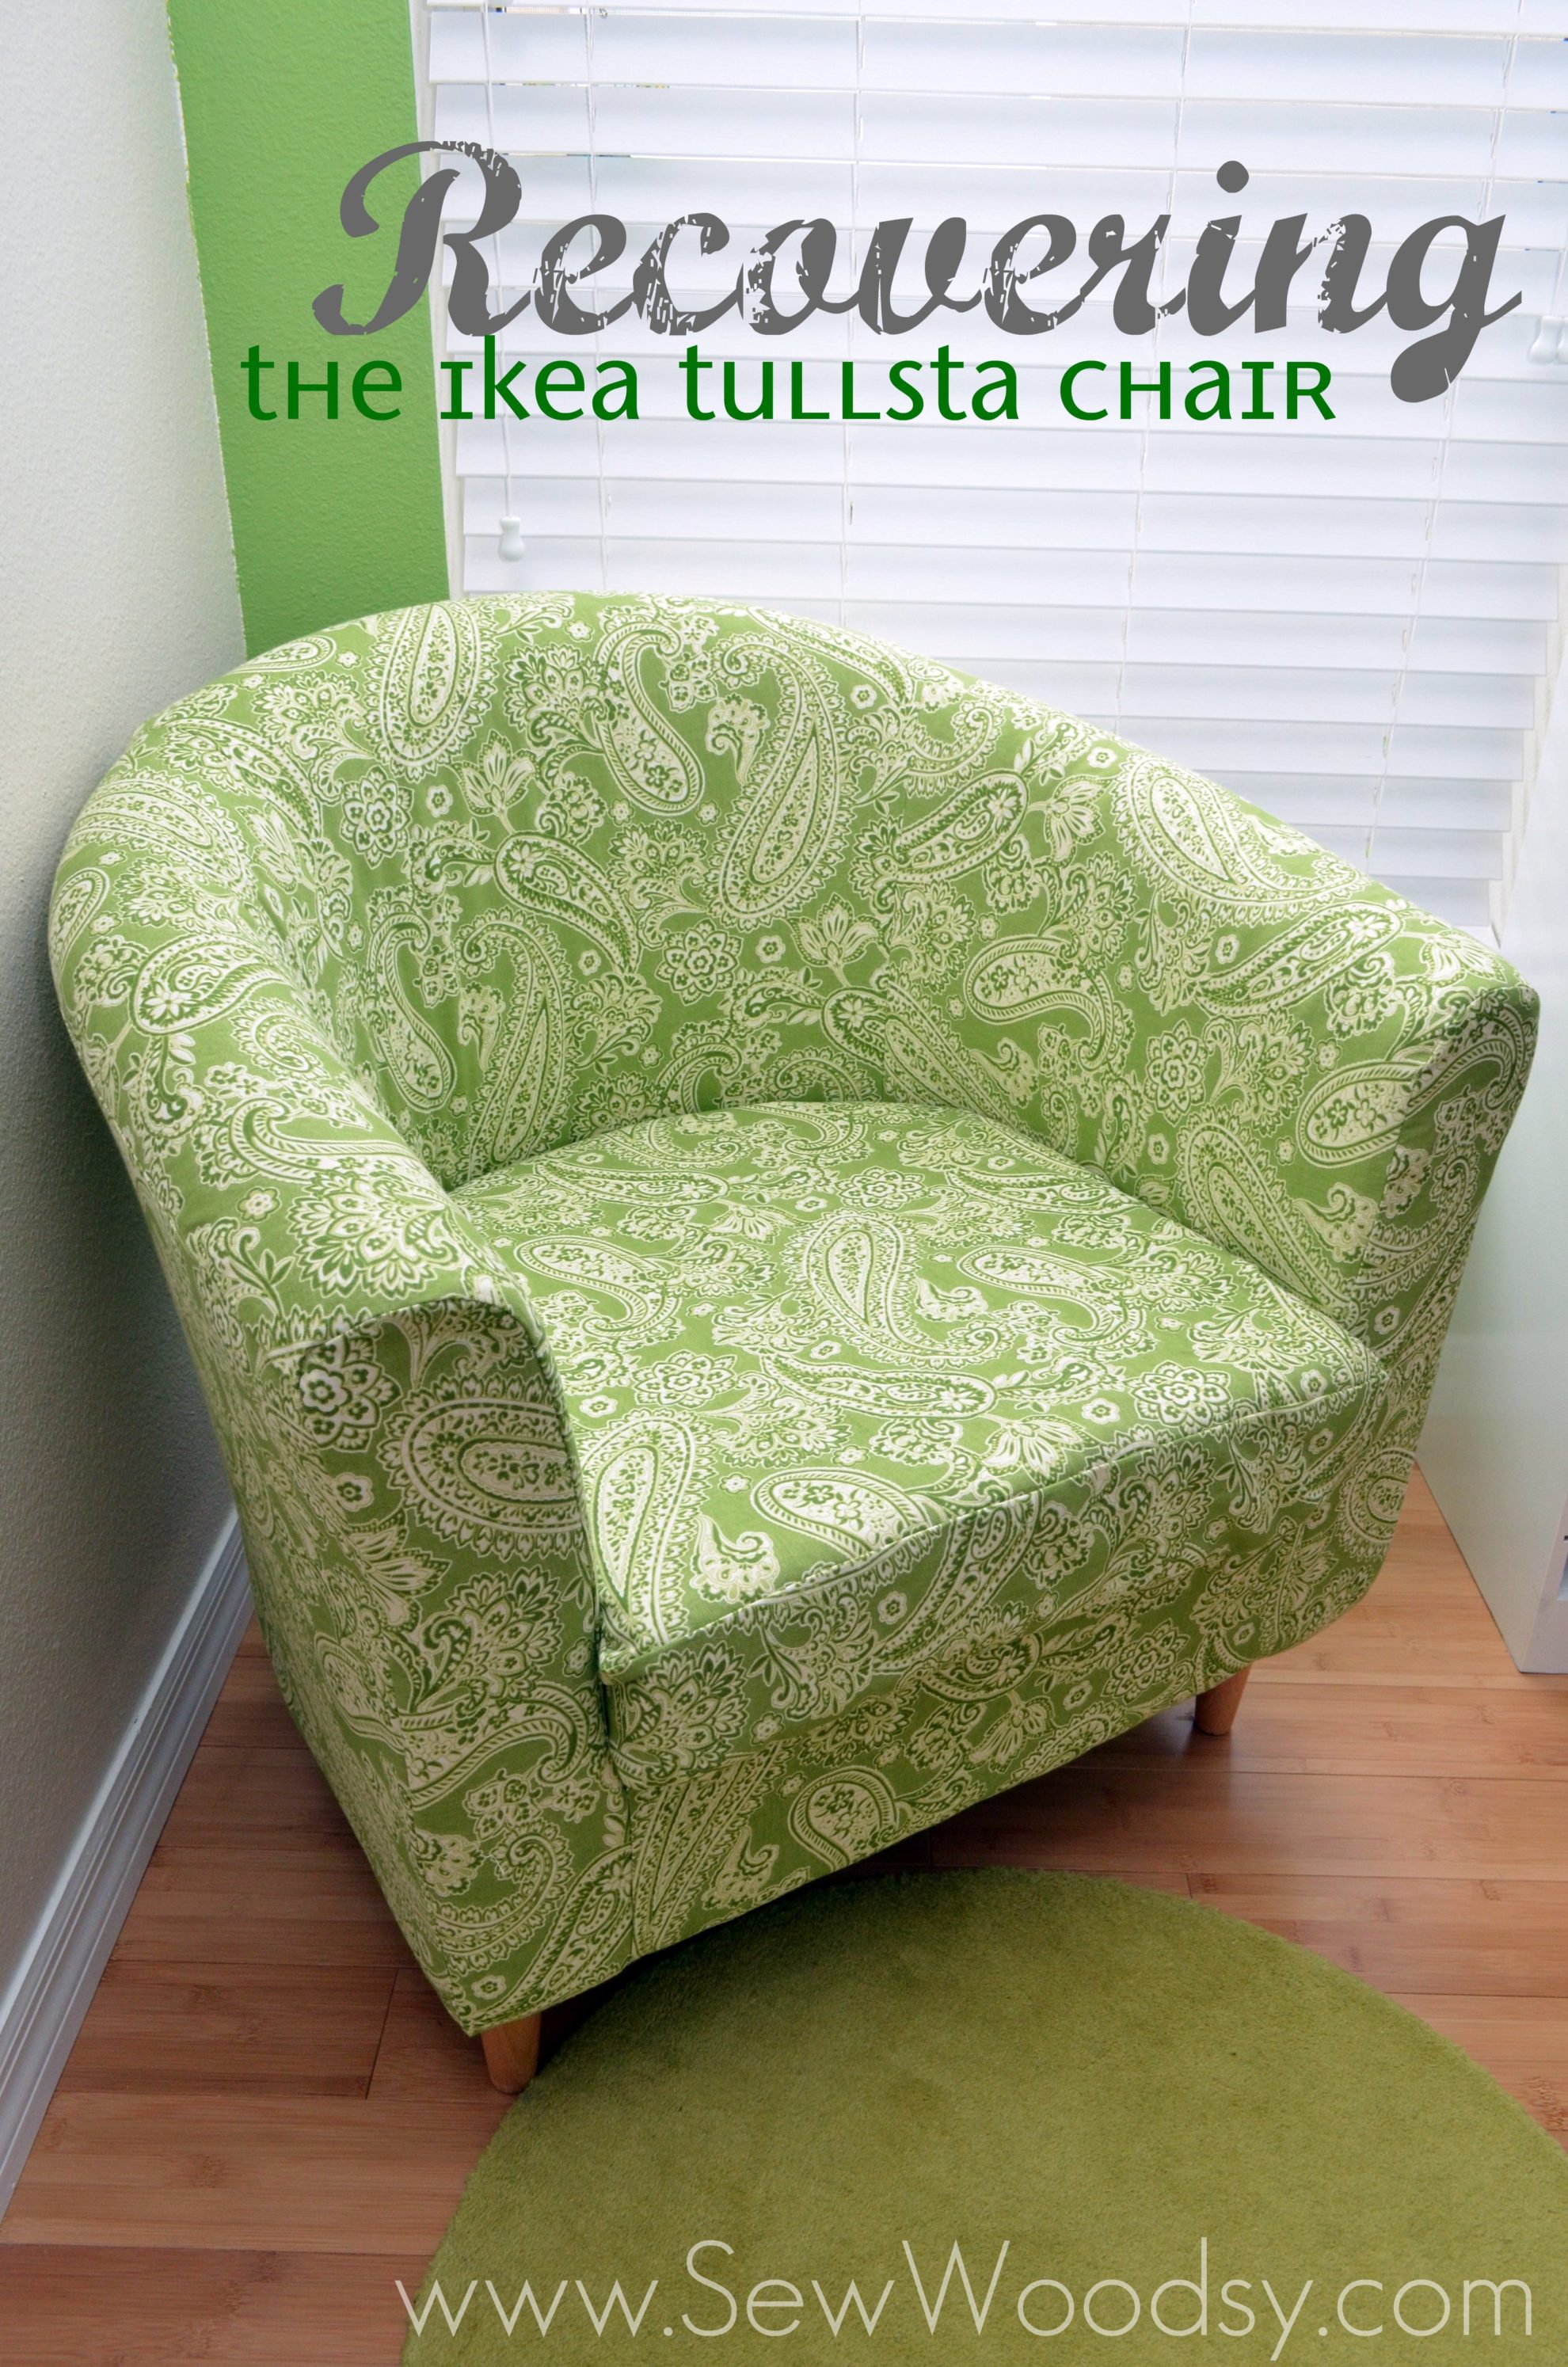
    This project has been a labor of love for sadly over two and a half years now! I finally finished the chair in September before we left for our vacation. I was determined to finish it because frankly I’m tired of hearing Mr. Woodsy complain about it not being done. We bought this chair used from a friend who was moving out of town for a whopping $25! The Tullsta chair retails at ikea for new for $200! I knew how good of deal we got; however, our friend had cats and the chair was a little beat up. I had been looking for a chair for the craft room for a while and figured we could easily recover this chair with a fabric that matched the color scheme I had planned in the craft room. Shortly, after buying the chair I fell in love with inexpensive canvas fabric for a whopping $3 a yard. I bought 5 yards praying that it would be enough to cover the chair. Thankfully, it was!

    Please keep in mind that these pictures were taken over 2 years ago. My photography has improved immensely since then.

    Supplies:

    5 yards of fabric

    Invisible Ink Pen

    Ruler

    Sewing Machine

    Pins/Pin Cushion

    Scissors

    Staple Gun / Hammer

    Recovering the Ikea Tullsta Chair

    The first thing we did was remove the existing clawed-up covering from the chair. We used the covering as our pattern to recreate the new cover. I would like to make note that I think the chair sat like this in our pool table room for a good 6 months!

    Recovering the Ikea Tullsta Chair

    We laid out the fabric I chose and began tracing around each panel. This was Mr. Woodsy’s job in the project. I have no patience for this and got confused in less than a second. He did an amazing job tracing/cutting out to ensure all pieces fit together.

    Recovering the Ikea Tullsta Chair

    Mr. Woodsy would trace around the existing cover, and would cut out each piece as he drew it.

    Recovering the Ikea Tullsta Chair

    This is what it would like after he traced around the existing cover.
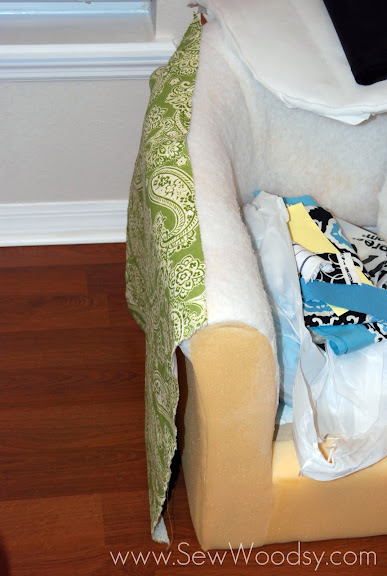
    Recovering the Ikea Tullsta Chair

    The first piece of fabric was cut! He would lay each piece of fabric on the chair where it belonged.

    Recovering the Ikea Tullsta Chair

    Then he cut out the two front arm pieces.

    Recovering the Ikea Tullsta Chair

    Next up, it was my turn to finally start sewing some of the chair. Mr. Woodsy traced, cut, and placed the fabric where I needed to sew it.

    Recovering the Ikea Tullsta Chair

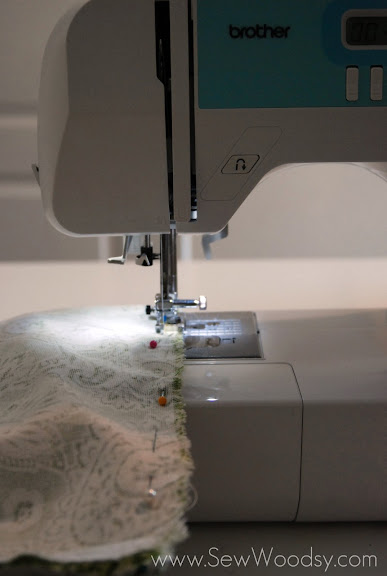
    Almost, one year later and I finally began to sew the actual cover together.
    Recovering the Ikea Tullsta Chair

    Pins galore… I found myself constantly stopping and checking where I needed to sew next.

    Recovering the Ikea Tullsta Chair

    This is what it looked like as I sewed each part of the cover.

    Recovering the Ikea Tullsta Chair

    We semi-completed the chair back in May. That was until I attempted to finish off the last part of the chair. The cushion. Mr. Woodsy left it to me to cut out the cloth and sew it. MAJOR FAIL on my behalf. I put the zipper on the flat slide not the curved side and well… the rest was history. This is the only picture I’m showing of the cushion because I had made an epic fail. So I tucked in slip cover for the cushion into the chair and left it like that for a few months. In August/September, I finally tackled my fears. Well, Mr. Woodsy took apart what I needed to fix and well, it actually came out pretty good. Including the zipper on the curved back end.

    Recovering the Ikea Tullsta Chair

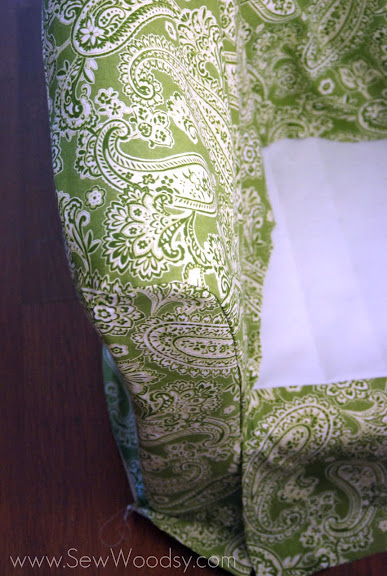
    Going back to the chair cover. This is what it looked like before we began stapling it to the frame.
    Recovering the Ikea Tullsta Chair

    Not gonna lie. I’ve impressed myself with this complex re-upholstering job!
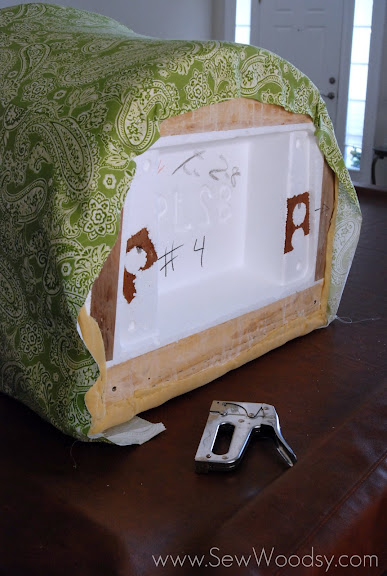
    Recovering the Ikea Tullsta ChairThe first thing we did was staple the cover to the bottom of the chair frame.
    Recovering the Ikea Tullsta Chair

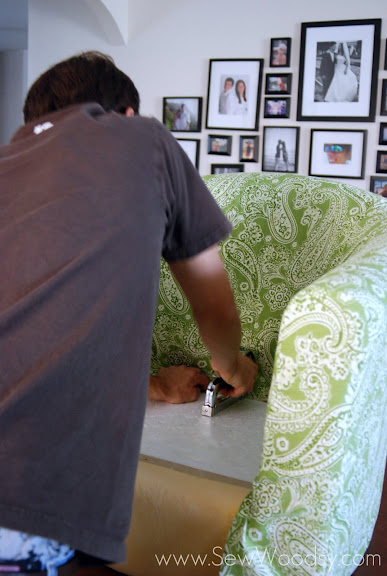
    Next up, staple the inside of the cover to the inside of the chair.

    Recovering the Ikea Tullsta Chair

    This is how it looked almost complete.
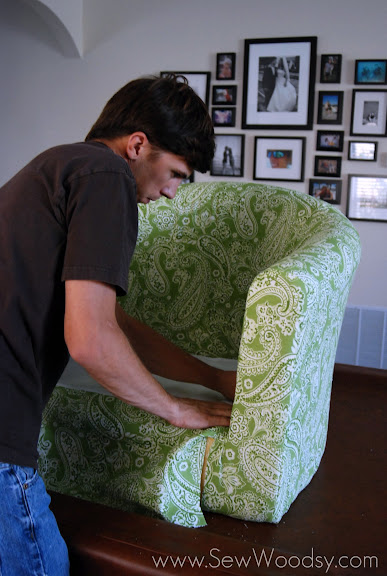
    Recovering the Ikea Tullsta Chair

    Adding the bottom half to the chair made it almost complete!

    Recovering the Ikea Tullsta Chair

    Close up of all the staples. It was after this project when we wished we had a pneumatic staple gun.

    Recovering the Ikea Tullsta Chair

    Mr. Woodsy added the backing to the bottom of the chair. This is one thing we salvaged from the old chair.
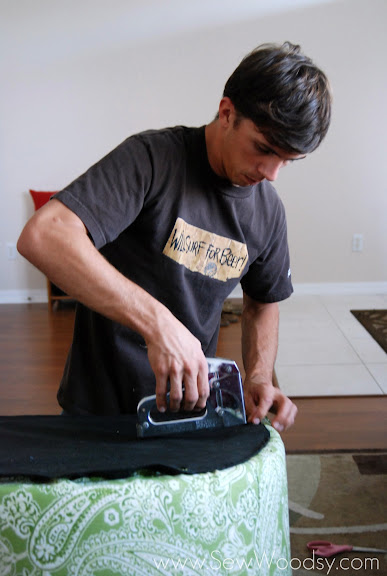
    Recovering the Ikea Tullsta Chair

    Last of the staples!

    Recovering the Ikea Tullsta Chair

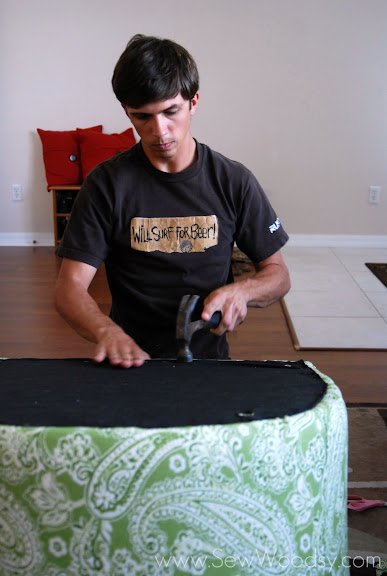
    We found that for some reason the staples were not going all the way into the chair. So after every few staples, Mr. Woodsy would use a hammer to push them down into the chair.

    Recovering the Ikea Tullsta Chair

    Place the legs on the chair.

    Recovering the Ikea Tullsta Chair

    Recovering the Ikea Tullsta Chair

    Recovering the Ikea Tullsta Chair

    Recovering the Ikea Tullsta Chair

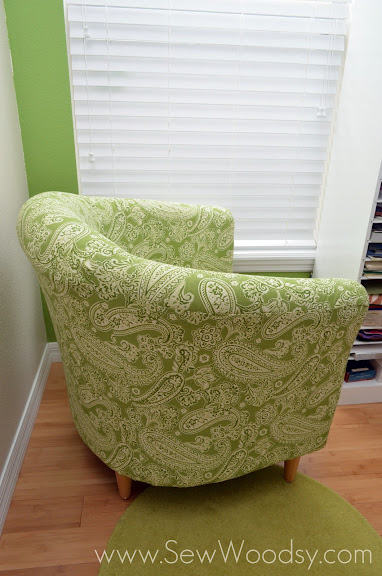
    So, what do you think? I don’t think most people who see the chair even realize that we re-upholstered it.

    Have you ever re-upholstered a piece of furniture? Did it take you over 2 years like us? 


    « {Travel} Nice, France
    {Travel} Saint Paul de Vence, France »

    Reader Interactions

    Comments

    1. Steph @ The Silly Pearl says

      November 12, 2012 at 2:44 pm

      Thank you so much Katie for sharing how you guys did this! Awesome!

      Reply
      • Mrs. Woodsy aka Katie says

        November 12, 2012 at 3:07 pm

        Thanks Steph! It was a labor of love, but well worth it in the end!

        Reply
        • Megan says

          December 06, 2015 at 5:55 pm

          When you removed the original cover, did it come off it one piece or was it sewed to the chair at the seams? I bought the Tullsta in “natural” and it’s starting to get dirty, so I want to remove the fabric, dye it blue, and put it back on. Do you think that’s possible for this chair? Thanks in advance!

          Reply
          • Katie says

            December 10, 2015 at 8:42 pm

            Hi Megan, It came off all in one piece. I think it’s possible to dye it if you are very careful when you remove all the staples underneath the chair and then re-staple it on very tightly! Good luck and send me pictures of the before and after if you do it!

            Reply
            • Sandy R. says

              December 28, 2015 at 12:31 am

              IKEA Tullsta chair: I just saw this blog posting…and so glad that I did! I just picked up a used Tullsta chair and am about to reupholster it. I saw that you say you used 5-yards of fabric to cover it — was that too much, or just enough? I ask as I just bought 4-yards of fabric (54-in. wide)to cover it as I saw someone on YouTube covering a similar chair with that amount. Any help here is appreciated. Many thanks!

            • Katie says

              December 30, 2015 at 7:40 pm

              Sandy I think you should be ok. I bought that much because I wanted to make sure I had enough to cover it and I did–I was able to recover a chair and a few other items too and I still have leftover fabric. Good luck and send me a photo if you make one!

          • Tulip House says

            January 19, 2018 at 5:35 pm

            I’m trying to find a source for a slipcover pattern…not “recover”. I tried one I received called “Ikea Fauteuil Idea Tullista” (French woman M. Albrecht), but it didn’t work. Know where I can get a pattern?

            Thanks!

            Reply
            • Katie says

              January 29, 2018 at 10:09 am

              No unfortunately, I have no idea where you could get a pattern. Sorry!

    2. sandra k williams says

      November 12, 2012 at 4:22 pm

      yes! i had a small upholstering business for a long time. people around our small town would send me a lot of work. just wanted to let you know that i know upholstering and that chair looks greaaaaat. i love the fabric [where did you get it?], even tho it took 2 loooong years you did a wonderful job. looks professional, beautiful fabric, beautiful chair, you did one great job here..

      Reply
      • Mrs. Woodsy aka Katie says

        November 12, 2012 at 9:43 pm

        Sandra. Thank you so much for the kind compliments. I’m pretty proud of our chair sans my cushion (I know I could have done better if I would have tried harder)! This was our first reupholstering project and we learned so much–hence why it took us so long. In the middle of this chair recovering madness we reupholstered and tufted a bench! lol.
        p.s. we got our fabric from a discount fabric store here in town; however, I’ve seen this fabric at JoAnns for $12 per yard in the canvas area.

        Reply
    3. Anne @ DesignDreamsbyAnne says

      November 12, 2012 at 9:26 pm

      Wow, I don’t think I would ever take a project like this one, but you did a magnificent job! Congrats!!

      Reply
      • Mrs. Woodsy aka Katie says

        November 12, 2012 at 9:42 pm

        Thanks Anne. Seriously, I think we bit off more than we could for our first reupholstering project EVER! We learned so much from this project.

        Reply
    4. Sarah says

      November 13, 2012 at 9:03 am

      It looks great! Great motivation to get me going 🙂

      Reply
    5. Paula@SweetPea says

      November 16, 2012 at 5:41 am

      Wow! You guys did an incredible job on this. I am very interested in upholstery but have never attempted it.

      I love that you and your husband work together on projects. My husband and I do the same thing and it’s so much fun!

      Reply
      • Mrs. Woodsy aka Katie says

        November 16, 2012 at 9:22 am

        Thanks Paula! This was our first official upholstery project (2 years ago). We learned so much from it and of course picked a very challenging item to upholster. Start with a simple chair bottom and then go from there. It is kind of trial and error!

        Reply
    6. Vivienne @ The V Spot says

      November 16, 2012 at 12:59 pm

      Mr. Sew Woodsy is a great sport! 😉 I love that fabric (I have some of it for my outdoor cushions) it is beautiful and a great tutorial!

      Reply
      • Mrs. Woodsy aka Katie says

        November 16, 2012 at 3:42 pm

        Thanks Viv! He has WAY more patience than I do! lol.

        Reply
      • Rita says

        August 03, 2020 at 1:54 pm

        Ah, loved this, I wasn’t sure if I could save my €20 tullsta but now I’m ready for the challenge!!!

        Reply
        • Katie says

          August 25, 2020 at 3:06 pm

          Rita, you can definitely do it!!!

          Reply
    7. Johnnie says

      November 16, 2012 at 6:57 pm

      WOW. I am super impressed. I have never tackled a furniture reupholster. You actually made me feel like I can do it. Thanks for the inspiration!

      Reply
      • Mrs. Woodsy aka Katie says

        November 18, 2012 at 9:14 am

        Thanks Johnnie! You can do it… reupholstering just takes a lot of patience!!!

        Reply
    8. Suzy Myers says

      November 16, 2012 at 7:46 pm

      You had me at paisley. Awesome job, both of you!
      suzy

      Reply
      • Mrs. Woodsy aka Katie says

        November 18, 2012 at 9:14 am

        Thanks Suzy!

        Reply
    9. Kim @ Sand & Sisal says

      November 17, 2012 at 12:08 am

      You all seriously did an amazing job on this! That fabric is beautiful!

      Reply
      • Mrs. Woodsy aka Katie says

        November 18, 2012 at 9:14 am

        Kim, thanks for the kind words.

        Reply
    10. malia says

      November 17, 2012 at 9:07 am

      What a pretty and comfy looking chair!

      Reply
      • Mrs. Woodsy aka Katie says

        November 18, 2012 at 9:15 am

        Thanks Malia! It is comfy (when I don’t have stuff sitting on it) lol.

        Reply
    11. Taryn @ Design, Dining + Diapers says

      November 17, 2012 at 6:41 pm

      Oh this looks so great! Beautiful fabric choice and great tutorial. Love it.

      Reply
      • Mrs. Woodsy aka Katie says

        November 18, 2012 at 9:16 am

        Thanks for the kind words Taryn. Every time I look at it I’m still amazed that we reupholstered it!

        Reply
    12. Amy* says

      November 19, 2012 at 7:55 am

      All good things come to those who wait and this is a GOOD Thing!! I love the paisley print and the step out photos are great. Mr. Woodsy is now a master of upholstery 🙂 I am showing this to my Mr. who has a hankering to “make” a couch that our animals can’t destroy…I’m banking on the fact that this project will take at least 2 years…you are not alone.

      TFS!

      Amy*

      Reply
      • Mrs. Woodsy aka Katie says

        November 19, 2012 at 11:44 am

        Amy thanks for the kind compliments! Mr. Woodsy & I went to Haven back in June and he sat in on the upholstery class. Of course, he was the only guy there and had done the most amount of upholstery work! He was pretty proud of himself as all the women in the class were shocked at what he had accomplished! Good luck with your couch!

        Reply
    13. Heather says

      November 19, 2012 at 1:58 pm

      Wow – looks amazing guys! Love the fabric you chose too! You have waaayyy more patience than me! I have been thinking of making slipcovers for our wood kitchen chairs and I keep talking myself out of it – cause it seems way to hard and scary!

      Reply
      • Mrs. Woodsy aka Katie says

        November 19, 2012 at 5:03 pm

        Heather you are too sweet. Mr. Woodsy has way more patience than me! If you have a pattern to follow I think its less scary than starting from scratch! Good luck!

        Reply
    14. Tameika says

      June 11, 2013 at 3:56 pm

      I love, love, love what you have done with this chair!!!! I have been wanting to cover our tullsta but haven’t been brave enough. Did you happen to keep the pattern? and would you be willing to share?

      Reply
    15. Ana says

      September 05, 2013 at 1:28 am

      I’m so glad I came across this post, I found a Tullsta in the trash tonight and your post will definitely help with the reupholstering. It seems to be in pretty good shape, no funky smells but some stains. I had initially thought of covering the chair without removing the old fabric (didn’t know I could!) but now that I see how it’s done I’m definitely going to do it the right way. Thanks a bunch!

      Reply
      • Katie says

        September 05, 2013 at 7:56 am

        Ana what an awesome find! I’m going to tell you–you definitely need lots of patience to recover this chair but the end result will be well worth it! Trust me!!!!We bought 6 yards of fabric and had plenty to even redo the cushion portion (twice)! Slow and steady and make sure you mark all the pieces of the fabric as you pull them off the chair and of course cut new pieces! Promise me you will send me photos when you are done!!!

        Reply
    16. MrsProcrastinator says

      October 01, 2013 at 2:17 am

      Well done. It takes me a few years to do things, all on the back burner as any great procrastinator would do. This is why I keep everything, most things anyway. Your chair looks fab, like new. Great inspiration, though I’m not up to it right now, I want breakfast…

      Reply
      • Katie says

        October 01, 2013 at 8:56 pm

        Ha ha thanks! Yes–it was a labor of love but it turned out amazing!

        Reply
    17. Nancy says

      January 05, 2014 at 9:03 pm

      I was so happy to see this article. We have a pair of original barrel style chairs (only the legs are different) that my daughter and I will be recovering when we locate the fabric we like at a reasonable price.

      Reply
      • Katie says

        January 07, 2014 at 1:57 pm

        Good luck Nancy and take your time… maybe not 2 years like we did! 😉

        Reply
    18. Catherine says

      February 08, 2014 at 6:39 pm

      I have this chair. Two actually. My husky mix adores one of them so much he has marked one in various ways. Thank you for documenting your love/hate relationship with the reupholster! It gives me hope!

      Reply
      • Katie says

        February 09, 2014 at 6:54 am

        ha ha thanks Catherine–It was a labor of love but we showed it can be done!

        Reply
    19. Sara says

      February 09, 2014 at 4:12 pm

      Wow! Can I have your cutting table?! haha 🙂 I have so many projects that sit forever, too!

      Reply
      • Katie says

        February 15, 2014 at 5:30 am

        Ha ha thanks Sara! Ummm yes, the pool table is used more for craft/diy projects than it is for playing pool!

        Reply
    20. Kim says

      July 01, 2014 at 10:28 pm

      I realise I am a couple of years late posting this, however you have inspired me. I have a chair that has been sitting in my lounge for two years waiting to be recovered (my husband is in despair) and I started on it a few weeks ago ………….. only to find it extremely daunting so have left it ripped apart in the same spot (my husband is now threatening to burn it). I just needed a little inspiration, thank you.

      Reply
      • Katie says

        July 02, 2014 at 2:43 pm

        Kim! I’m so glad we could inspire you. Recovering a chair is a lot of work and takes TONS of time. Try spending just a few minutes each day on it–it will eventually get done. Just like ours… 2 years in the making!

        Reply
    21. Tamara says

      July 15, 2014 at 11:23 pm

      Hey! Thanks for posting your DIY! 2 of these chairs popped up on my local Kijiji, and I was searching to find out how hard they would be to recover (from what I gather, not too hard, just time-consuming :P). What type of fabric did you use? I am fairly new to sewing, so fabrics are still a mystery to me 😛 Thanks again for the inspiration! 😀

      Reply
      • Katie says

        July 16, 2014 at 5:01 pm

        Congrats on the find. I used a canvas fabric that is thicker then traditional cotton so that it could take a beaten! Definitely use a denim needle in your sewing machine if you choose canvas.

        Reply
    22. Cindy says

      December 07, 2014 at 10:07 am

      Yes, I have, long, long, ago; but it was more like two weeks, not two years. We desperately needed the chair! Thinking I’d like to do some more as I’m having trouble finding exactly what I want for a reasonable price for a couple of re-decorating projects. Why pay someone else when I can easily do it myself?

      Reply
      • Katie says

        December 08, 2014 at 10:29 pm

        Cindy I totally agree with you!

        Reply
    23. Amma Gramma says

      July 13, 2015 at 1:30 pm

      Wow! Your chair looks fantastic. Love that fabric. I purchased the same chair ($3.00) a year ago n I’veI’ve been trying to figure out how to rrecover it. I have never done this before so your info is just the incentive I needed. I did change out the legs and replaced with casters so the chair will roll. Hope mine turns out as nice.

      Reply
      • Katie says

        July 22, 2015 at 4:56 pm

        Thanks Amma. You can do it! Just take your time. As you can tell from the photos we removed all the fabric and just made a pattern from the existing fabric! Once your done send me a picture! I would love to see the finished product!

        Reply
    24. Michelle says

      February 08, 2016 at 2:34 am

      This turned out amazing!!! I just purchased a used Tullsta and I’m excited to try this! One question- when tracing did you add extra room for seam allowance? Or is already accounted for since you are tracing from the inside of the pattern? I always get confused with this! lol

      thanks!
      -MIchelle

      Reply
      • Katie says

        February 15, 2016 at 3:35 pm

        Thank you! The chair is still holding up a few years later! I left a little extra for error but not much because I was already tracing with the seam allowance accounted for.

        Reply
    25. Sally says

      July 27, 2016 at 9:58 am

      I just redid a very similar chair (after buying it a year ago from a barn sale for $5.00!!) I had a hard time getting the inside back of the chair smooth. How did you get it that way? I didn’t do too bad considering that it was my first try at upholstering. I have another chair on my project list…. a wingback. I have to admit that I’m a little nervous after the other one. Any tips??

      Reply
      • Katie says

        September 29, 2016 at 8:48 pm

        Hi Sally–thank you for taking the time to comment. I’ll be honest, it was our first time recovering a chair like this. I think it was luck! Good luck with the wingback! I’m sure it will turn out amazing!

        Reply
    26. Sandy R. says

      December 31, 2016 at 1:35 pm

      http://pin.it/bLq9pDC
      IKEA Tullsta chair reupholstering project completed! I wrote you on December 28, 2015 asking for feedback on my project, and am glad to say it’s done. I can’t see how to attach images here, so I copied a link to it on Pinterest. Hope you like it! Sandy R.

      Reply
    27. L says

      October 27, 2018 at 8:03 pm

      Fantastic!! So you happen to have the measurements..I know it is a long shot but I am hopeful

      Reply
      • Katie says

        October 29, 2018 at 9:50 pm

        Hi L, I do not! I took the tullsta chair cover off and just traced. I will tell you I used about 3-4 yards of fabric. I recovered this chair years ago, so I can’t remember much more then that.

        Reply

    Leave a Reply Cancel reply

    Your email address will not be published. Required fields are marked *

    Primary Sidebar

    • Email
    • Facebook
    • Instagram
    • Pinterest
    • Twitter
    • YouTube
    Male and female hugging on each other in the woods.

    Hi, we're Katie & Jon! Welcome to our home away from home!

    Sew Woodsy is a lifestyle blog focusing on crafts, home DIY projects, family, travel and all things life. Get comfy and join us on our adventure!

    More About Us →

    9 different logos from various media outlets where Sew Woodsy has been featured on.

    Easter Projects

    • Kids Easter Basket Ideas
    • 25 Easter Basket Ideas for Toddlers
    • Free Easter Coloring Pages
    • 17 Easter Craft Ideas

    Trending

    • How to Create a Natural Log Pathway + Video
    • Tips & Tricks on Installing Butcher Block Countertops
    • How to Host a Baby Shower at Work
    • How to Use Heat n Bond

    Male and female hugging on each other in the woods.

    Hi, we're Katie & Jon! Welcome to our home away from home!

    Sew Woodsy is a lifestyle blog focusing on crafts, home DIY projects, family, travel and all things life. Get comfy and join us on our adventure!

    More About Us →

    9 different logos from various media outlets where Sew Woodsy has been featured on.

    Easter Projects

    • DIY Follow the Bunny Pillow Cover
    • Bunny Kisses & Easter Wishes Burlap Garden Flag
    • Easter Bunny Family Pillow
    • DIY Easter Bunny Onesie with Name

    Trending

    • How to Create a Natural Log Pathway + Video
    • Tips & Tricks on Installing Butcher Block Countertops
    • How to Host a Baby Shower at Work
    • How to Use Heat n Bond

    Footer

    ↑ back to top

    9 different logos from various media outlets where Sew Woodsy has been featured on.

    About

    • About Us
    • Privacy Policy
    • Accessibility Statement

    Newsletter

    • Sign Up! for emails and updates

    Contact

    • Contact
    • Work with us
    • Advertise

    Copyright © 2010 - 2022 Sew Woodsy