• Skip to primary navigation
  • Skip to main content
  • Skip to primary sidebar

Sew Woodsy logo

  • DIY
  • Crafts
  • Cricut
  • Travel
  • About
menu icon
go to homepage
search icon
Homepage link
  • Home
  • Thanksgiving
  • DIY
  • Cricut
  • Travel
  • About Us
    • Email
    • Facebook
    • Instagram
    • Pinterest
    • Twitter
    • YouTube
  • ×

    Sew Woodsy » Holiday

    Published: Dec 8, 2013 by Katie · This post may contain affiliate links.

    Instagram Time Capsule Ornament

    Sharing is caring!

    0 shares
    • Facebook
    • Twitter

    Day 8 of the 12 Days of Handmade Ornaments and today I have my good friend (in real life), Sarah from While They Snooze. She participated 2 years ago in our first every handmade ornament and shared her scrappy kids ornament. Today, she is sharing an Instagram time capsule ornament. Don’t forget to enter to win the Cricut Giveaway going on during our 12 day event!

    Instagram Time Capsule Ornament guest post from While They Snooze on SewWoodsy.com

    Hi everyone! Have you finished your shopping yet? I’m not even close, so we can scramble all hopped up on caffeine together. 🙂 I’m Sarah and I blog over at While They Snooze. There you can find thrifty, inexpensive ways to improve and decorate your home with tons of tutorials and gratuitous pictures of my kids. C’mon over! We have wine.

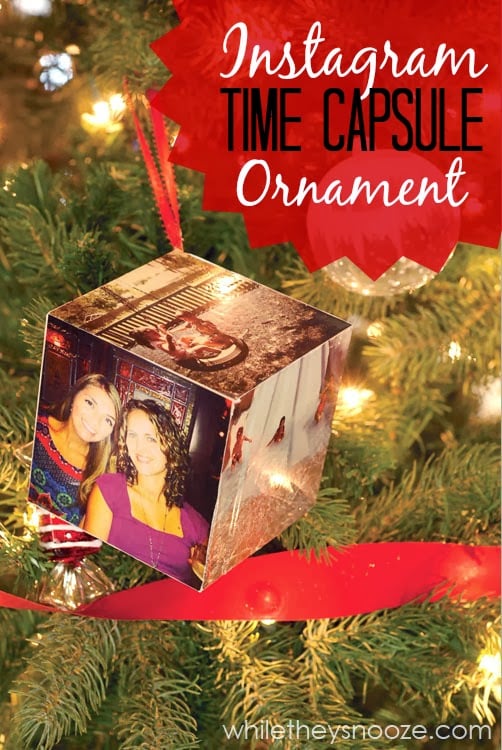
    Today, I’m going to show you how to make an Instagram time capsule ornament. It’s basically a small box filled with mementos from the past year and covered in your 6 favorite Instagrams from the same year. So kind of like a tiny scrapbook in ornament format. 🙂 I just keep thinking how I would LOVE to have one of these from when my parents or grandparents were little. Hoping my future grand kids get a kick out of good ole’ 2013 when granny was young.

    Supplies:

    • Small wooden trinket box (I got mine in the craft section of Walmart for $3)
    • 6 Instagram photos printed out the same size as your box
    • String
    • ModPodge and brush
    • Glue
    • Drill (if you can think of another way to get a hole in the box, you might not need the drill)
    • Optional: embellishments… ribbon, buttons, glitter, paint, etc.
    Instagram Time Capsule Ornament guest post from While They Snooze on SewWoodsy.com

    Step 1

    Drill a small hole in one corner of your box. Doesn’t matter which corner.

    Instagram Time Capsule Ornament guest post from While They Snooze on SewWoodsy.com

    Step 2

    Tie some string or ribbon into a loop and thread it through the hole from the inside. A large knot at the end with a dot of glue will keep it secure.

    Instagram Time Capsule Ornament guest post from While They Snooze on SewWoodsy.com
    Instagram Time Capsule Ornament guest post from While They Snooze on SewWoodsy.com

    Step 3

    Fill the box with small items you’d like future family members to find and glue the box shut. We just added a note since the kids didn’t want to part with anything permanently 🙂

    Instagram Time Capsule Ornament guest post from While They Snooze on SewWoodsy.com
    Instagram Time Capsule Ornament guest post from While They Snooze on SewWoodsy.com

    Step 4

    Spread ModPodge on your box and smooth the 6 photos onto each surface. Then, ModPodge over top and let dry.

    Instagram Time Capsule Ornament guest post from While They Snooze on SewWoodsy.com
    Instagram Time Capsule Ornament guest post from While They Snooze on SewWoodsy.com
    Spread it evenly so your finish is smooth. It will dry clear.
    Instagram Time Capsule Ornament guest post from While They Snooze on SewWoodsy.com

    And that’s it; an Instagram Time Capsule Ornament. You could add glitter or paint too. We kept ours plane.

    Instagram Time Capsule Ornament guest post from While They Snooze on SewWoodsy.com

    A small glimpse of one year to hang on your tree for years to come.

    Instagram Time Capsule Ornament guest post from While They Snooze on SewWoodsy.com
    Instagram Time Capsule Ornament guest post from While They Snooze on SewWoodsy.com
    « Glass Painted Monogram Ornament
    Snowman Ornament »

    Primary Sidebar

    • Email
    • Facebook
    • Instagram
    • Pinterest
    • Twitter
    • YouTube
    Male and female hugging on each other in the woods.

    Hi, we're Katie & Jon! Welcome to our home away from home!

    Sew Woodsy is a lifestyle blog focusing on crafts, home DIY projects, family, travel and all things life. Get comfy and join us on our adventure!

    More About Us →

    9 different logos from various media outlets where Sew Woodsy has been featured on.

    Easter Projects

    • Kids Easter Basket Ideas
    • 25 Easter Basket Ideas for Toddlers
    • Free Easter Coloring Pages
    • 17 Easter Craft Ideas

    Trending

    • How to Create a Natural Log Pathway + Video
    • Tips & Tricks on Installing Butcher Block Countertops
    • How to Host a Baby Shower at Work
    • How to Use Heat n Bond

    Male and female hugging on each other in the woods.

    Hi, we're Katie & Jon! Welcome to our home away from home!

    Sew Woodsy is a lifestyle blog focusing on crafts, home DIY projects, family, travel and all things life. Get comfy and join us on our adventure!

    More About Us →

    9 different logos from various media outlets where Sew Woodsy has been featured on.

    Easter Projects

    • DIY Follow the Bunny Pillow Cover
    • Bunny Kisses & Easter Wishes Burlap Garden Flag
    • Easter Bunny Family Pillow
    • DIY Easter Bunny Onesie with Name

    Trending

    • How to Create a Natural Log Pathway + Video
    • Tips & Tricks on Installing Butcher Block Countertops
    • How to Host a Baby Shower at Work
    • How to Use Heat n Bond

    Footer

    ↑ back to top

    9 different logos from various media outlets where Sew Woodsy has been featured on.

    About

    • About Us
    • Privacy Policy
    • Accessibility Statement

    Newsletter

    • Sign Up! for emails and updates

    Contact

    • Contact
    • Work with us
    • Advertise

    Copyright © 2010 - 2022 Sew Woodsy