Learn how to create my eye-catching and budget-friendly DIY LEGO costumes with step-by-step instructions and creative tips in this fun and informative guide all for under $30!
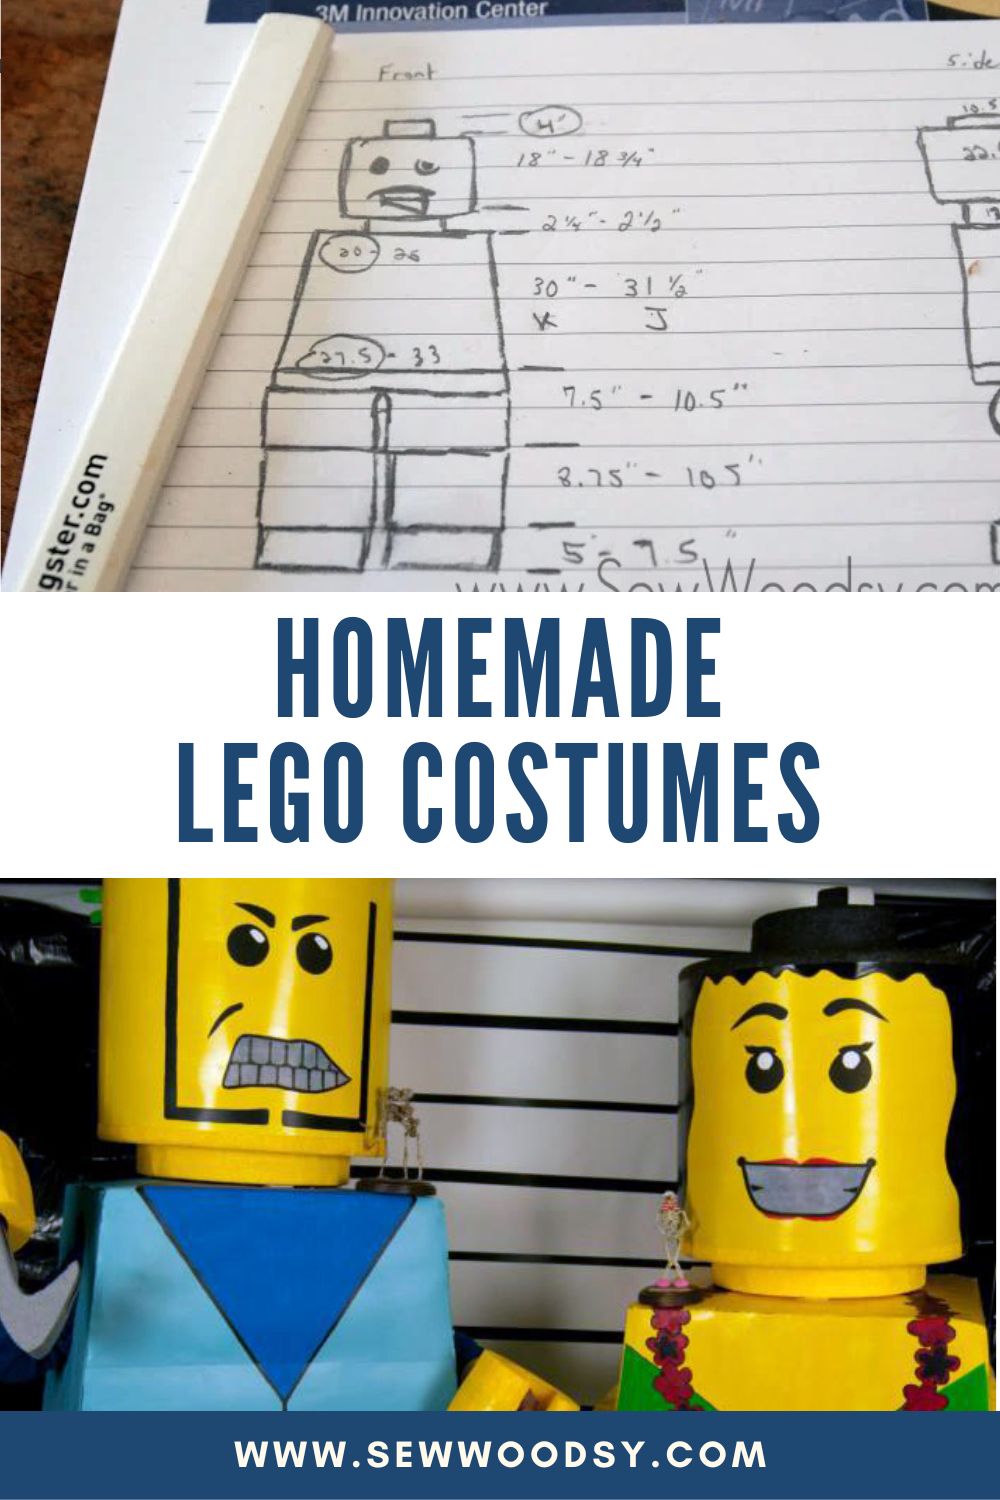
Last year, after returning home from Europe the pressure was on to figure out what we were going to dress up as for our friends annual Halloween party. I created a list of 25 DIY Couples Costumes for Halloween and shared it with Jon. We narrowed it down and that’s when he decided we were gonna create DIY Lego Costumes. Jon knew if we were gonna do this we were gonna do it right. We scoured the internet and never found a complete tutorial nor could we find real life measurements. So Jon got to sketching while I tried to narrow down which LEGO I wanted to be!
These costumes took us over 40 hours to create and we spent roughly $30! Some would argue go spend the $100+ on buying a costume, but we had fun making them and it was also a race against the clock since we had one week to complete them! By far these were the coolest costumes we’ve ever created in our life! Oh, and did I mention that we might have just taken not one but two categories last year–Best Couples Costume and Funniest.
These costumes were over 7 feet tall and we looked through the mouth portion since where the eyes were was too tall for both of us! We also had a very difficult time getting into our friends house. We couldn’t go through their haunted house because we would have ripped it down and/or knocked something over and getting into their house we practically had to un-assemble our costumes.
Table of contents
- Supplies
- How to Build the LEGO Body
- How to Make LEGO Feet
- DIY LEGO Costume Head
- How to Make LEGO Hands for Costume
- How to Make Foam Maracas
- How to make a Paper Grass Hula Skirt
- Try on the LEGO Costume
- Add the LEGO Logo
- Hula LEGO Costume
- Mean Face LEGO Costume
- Tips & Tricks
- Love all things LEGO?
- How to Make a LEGO Costume
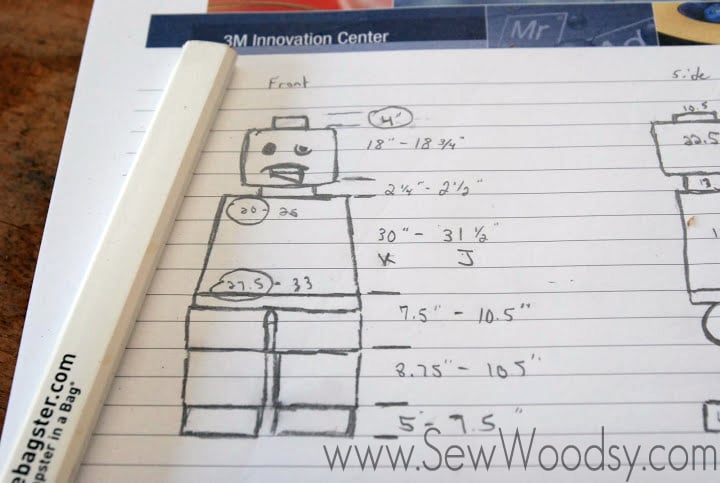
Here is the sketch up Jon created. He scaled down the sizes for both himself “J” and myself “K”. He’s 5’11 and I’m 5’1 so that is what the sizes are scaled too. Here is a rough list of supplies we used for our costumes.
Supplies
- Cardboard
- Foam
- Yard Stick Ruler
- Black Gaffers Tape
- Gorilla Glue
- Hot Glue
- Hand Saw
- Weights
- Poster Tube
- Meat Carving Knife
- Yellow Paint
- Yellow Poster Board
- White Poster Board
- Black Sharpie
- Black Paint
- Blue Paint
- Pink Paint
- Metal Mesh
- White Spray Paint
How to Build the LEGO Body
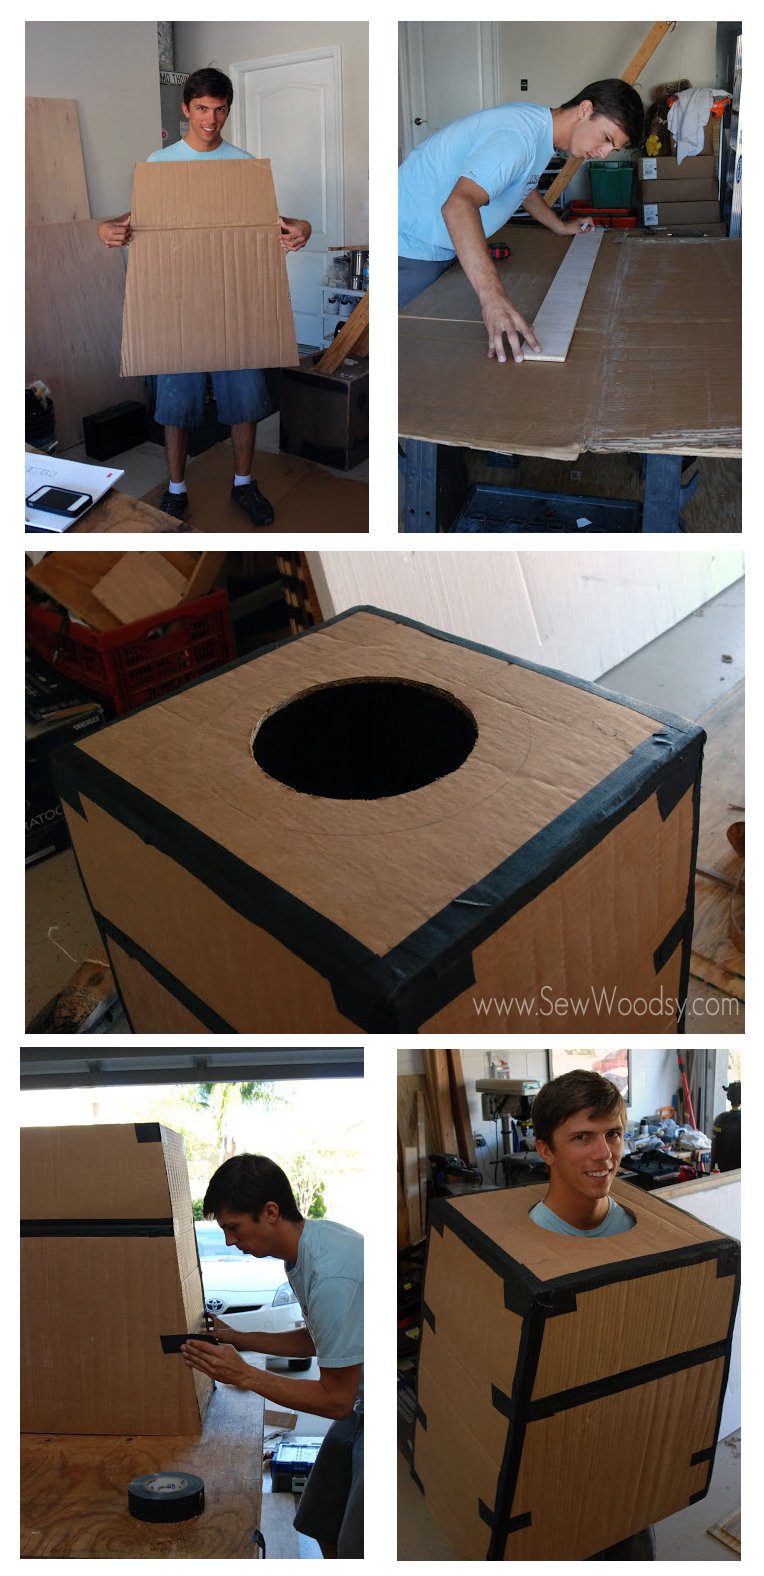
First, create the base and body of the LEGO costume. Cut out cardboard for the body. Size will vary depending on the person wearing the costume. Secure the carboard body together with black gaffers tape — its super sticky.
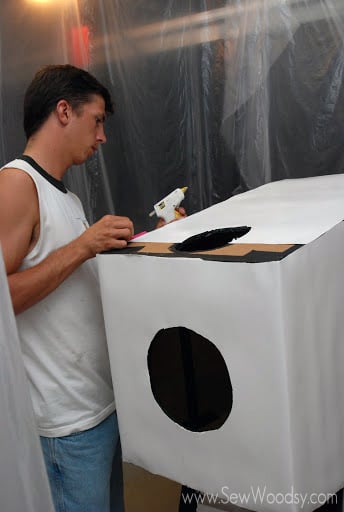
Next, we used hot glue and secured white poster board to the bodies and feet. We wanted a smooth surface and found this was the easiest way to achieve the smooth surface.
We wanted a smooth surface and found this was the easiest way to achieve the smooth surface. You’ll noticed plastic in the background. Jon originally thought he was going to spray the costumes with our paint sprayer, but it didn’t work out.
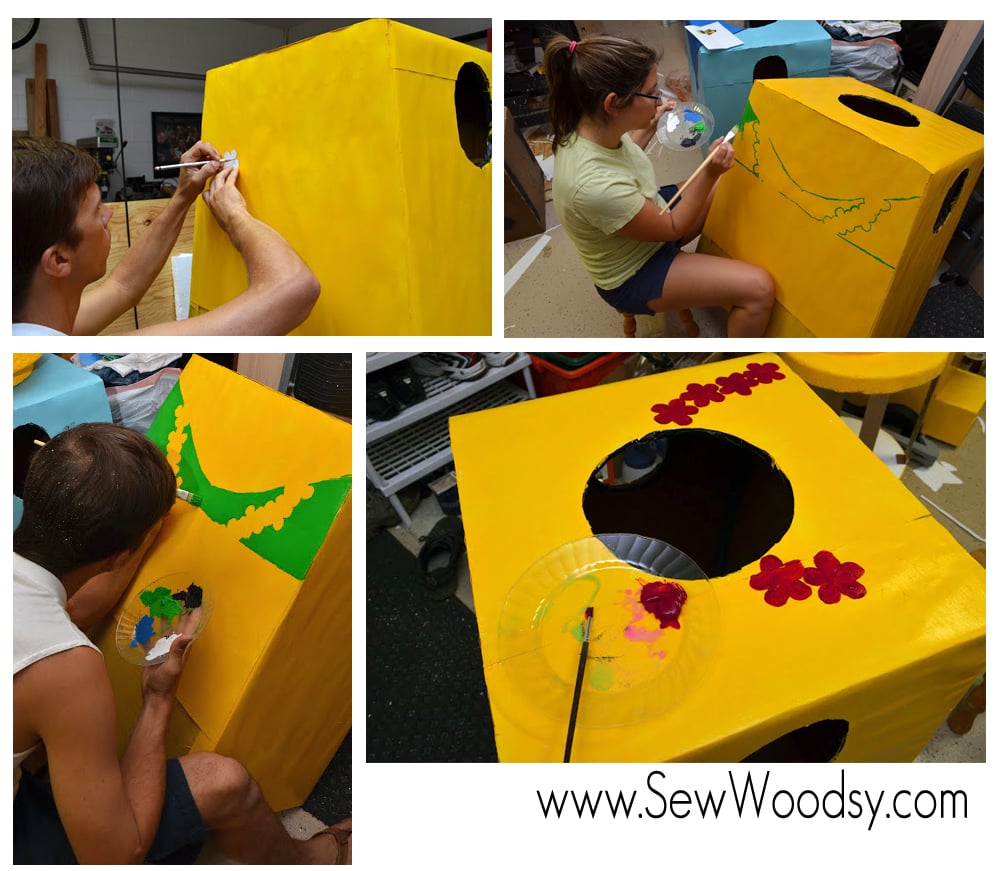
Then, hand paint all the poster board–majority will be yellow and depending on LEGO design will depend on colors you use.
How to Make LEGO Feet

Next, build out the feet. Build the sides of the feet out of thick foam and the fronts and backs out of cardboard. Once the feet were secured and glue was dried we used hot glue and secured white poster board to the feet. We painted the feet the same time we painted the bodies.
DIY LEGO Costume Head
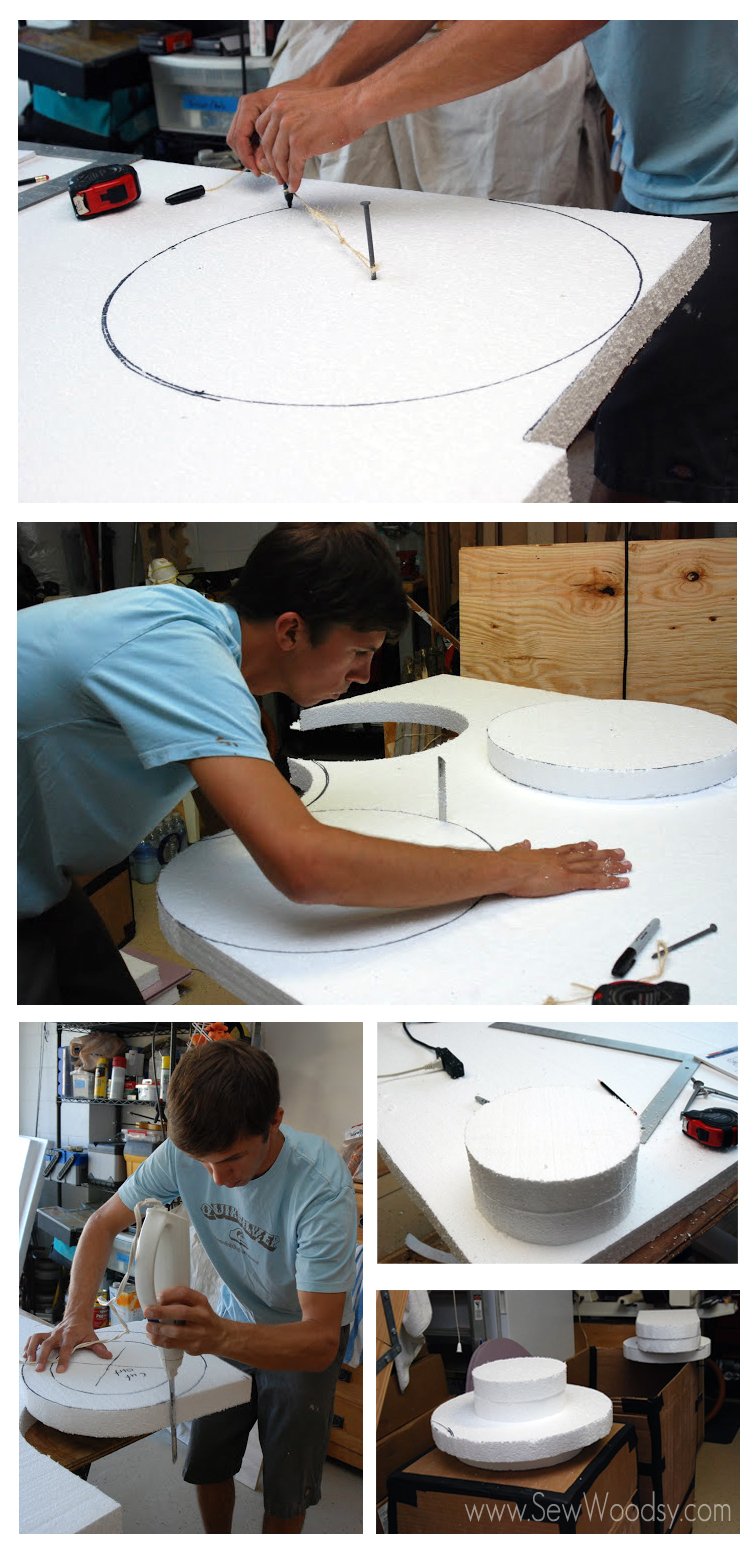
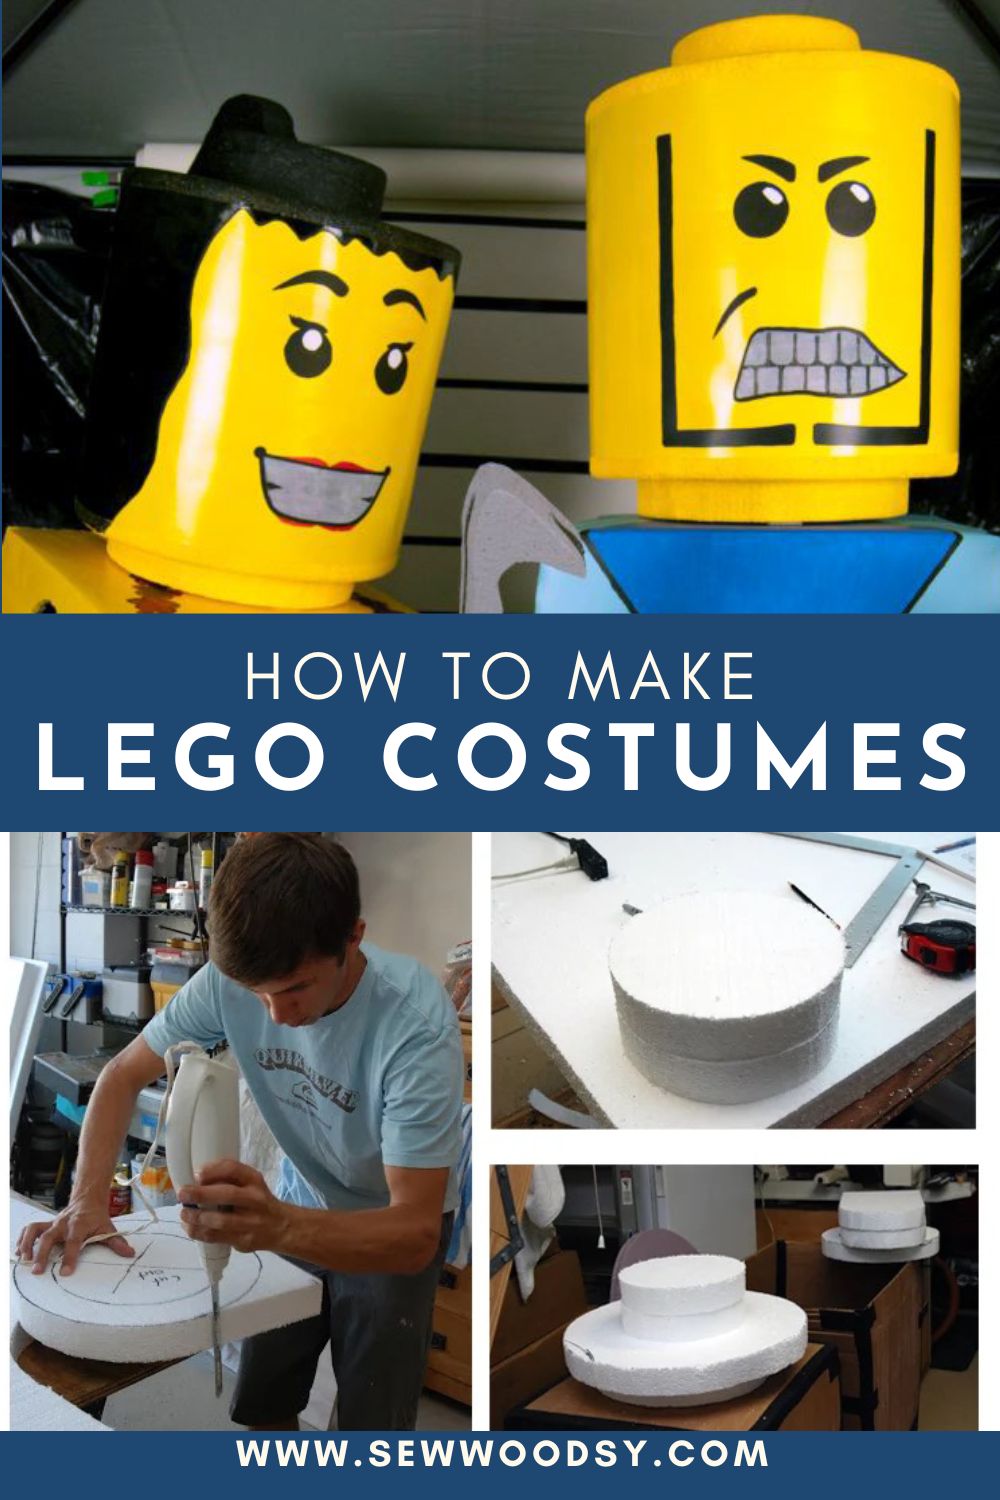
To make the LEGO heads you will want to start by making the tops of the heads. We used heavy styrofoam for the tops of the head. You will need one larger piece and 3 smaller per LEGO costume.
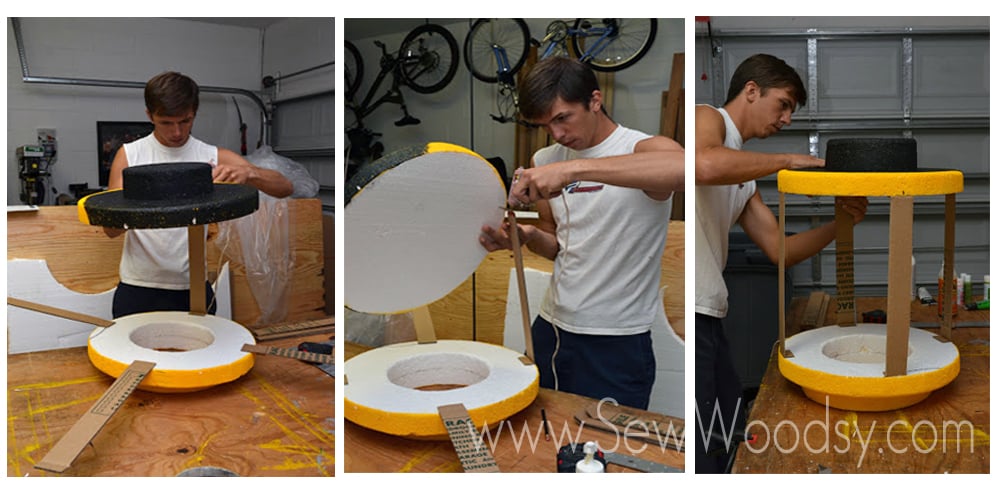
We secured the smaller foam tops on the larger and then painted them yellow and black where appropriate for mine and all yellow for the classic LEGO. Jon used 2-inch strips of cardboard to hold up the tops.
NOTE: Make sure you get all of your cutting done first before painting. Trust me… the last thing you want is foam dust on your freshly painted costume.

Spray paint the screens white that you will need for the mouths. This needs to be done prior to placing on the heads! You will want to also pre-cut the mouths out before placing the poster board on the heads. Once the screens are dry adhere screens to the mouth.
Next, it’s time to secure the yellow poster board on to the lego heads using hot glue. Make sure to place the seams in the back. Then, you will need to either freehand draw the faces on using a pencil OR you can cut faces and apply vinyl to the cardboard.
He penciled on the faces and then began painting. Jon used a black sharpie marker to draw the thinner details including the lines for the hair.
How to Make LEGO Hands for Costume
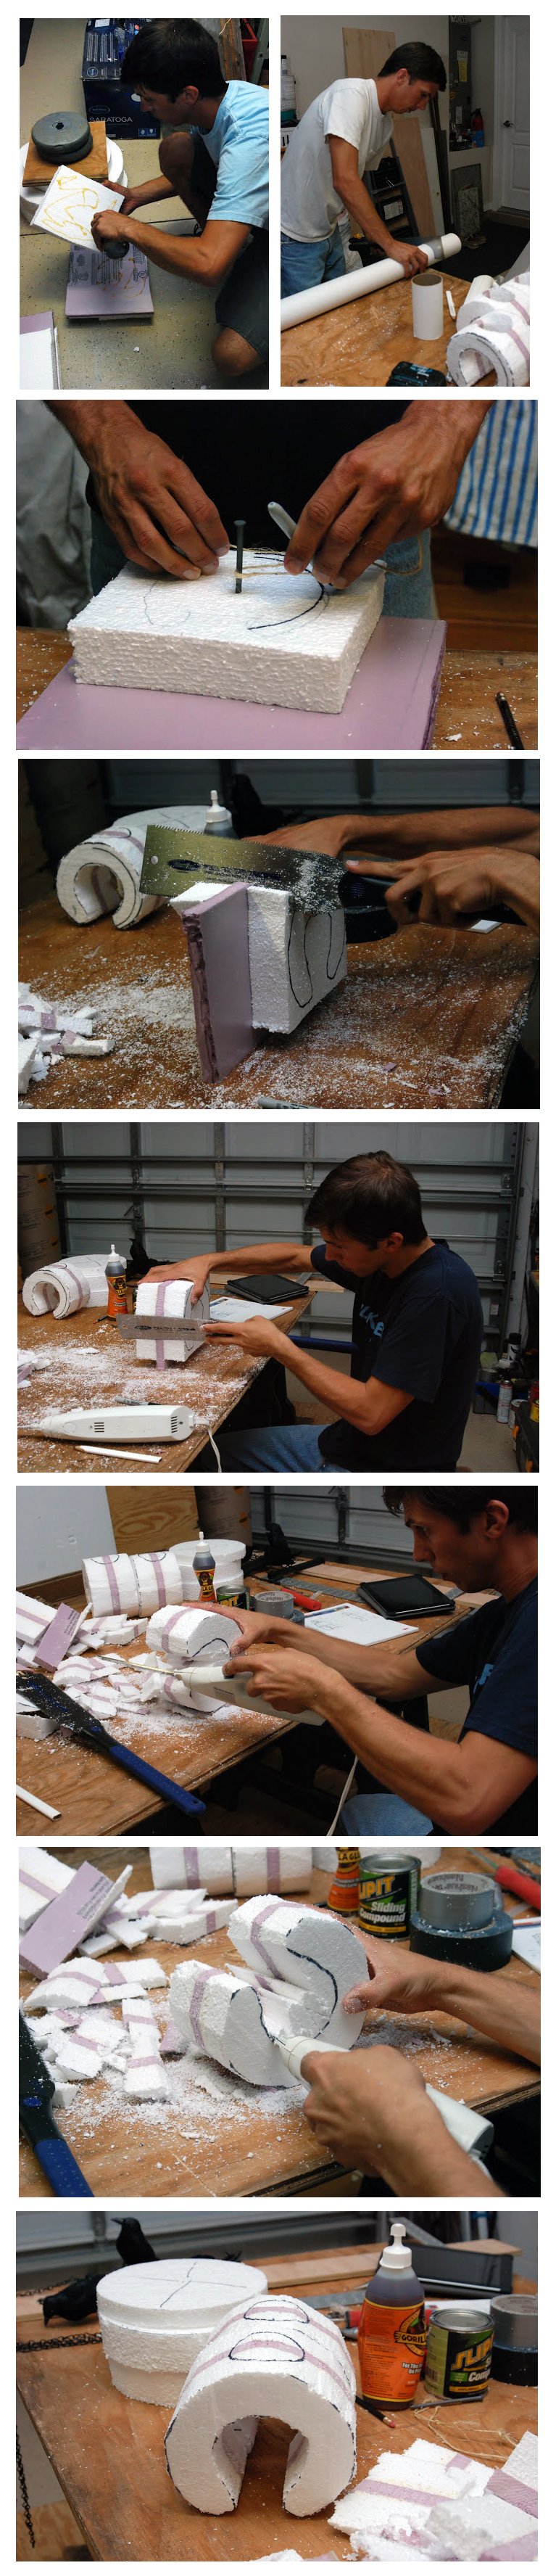
Next, carve out the hands. The hands were created by layering multiple pieces of foam together with the thicker purple foam. We placed weights on top of the glued together foam over night to ensure that they stuck together. Check out the picture above to reference the layers of foam we glued together prior to cutting out the hands.
We cut “c’s” out of the hands and then began cutting the holes where we would put our actual hands through. We used a large cardboard tube as our guide to cut the holes out for the hands. You will want to use Gorilla Glue to secure the foam together.
How to Make Foam Maracas
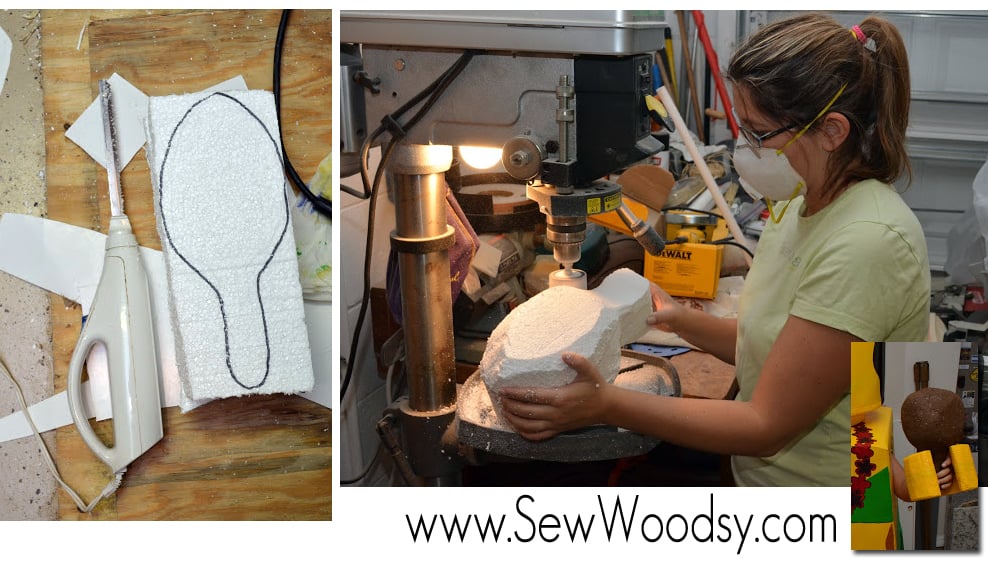
Glue a few pieces of leftover foam together, freehand drew the maracas on to the foam. Carved out as much as possible of the foam using the electric carving knife.
If you have access to a drill press, add a sanding pad to it and begin to run the foam around the edge of the sanding pads to get them to be as round as possible.
How to make a Paper Grass Hula Skirt
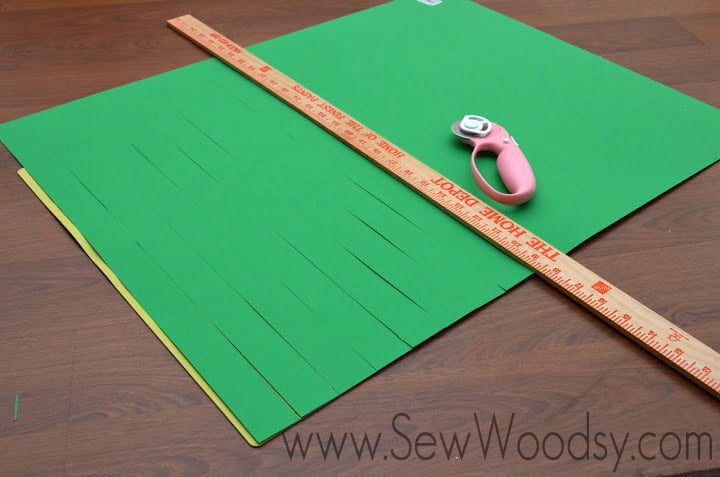
While my husband worked on the details of the faces I made my grass hula skirt out of a few pieces of green poster board from the dollar store. I believe 3 to be exact. I cut the skirt fringes 1-inch a part and left a few inches on the top.
Try on the LEGO Costume
Once my costume was complete I tried it on sans the feet. It looked awesome and fit well although to be honest–cardboard is not the most comfortable thing to wear!
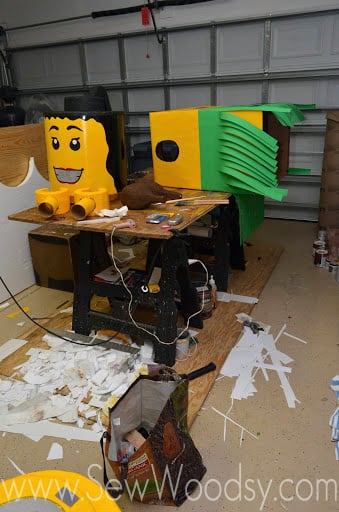
This was the aftermath! Paper and scraps everywhere… we had just a little bit of time to spare until we had to get to our friends party!
Add the LEGO Logo
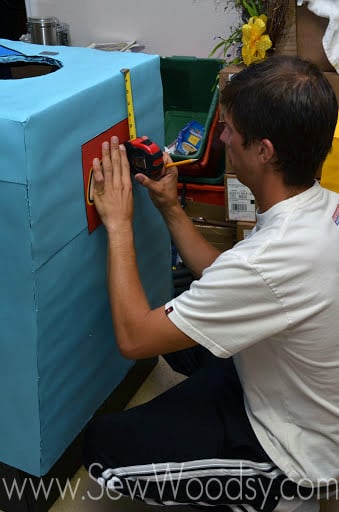
Last minute, like 20 minutes before leaving for our friends party we realized we needed to add the LEGO logo to the back of our costumes. So we printed out the largest logo we could find, measured to make sure it was centered and glued them on!
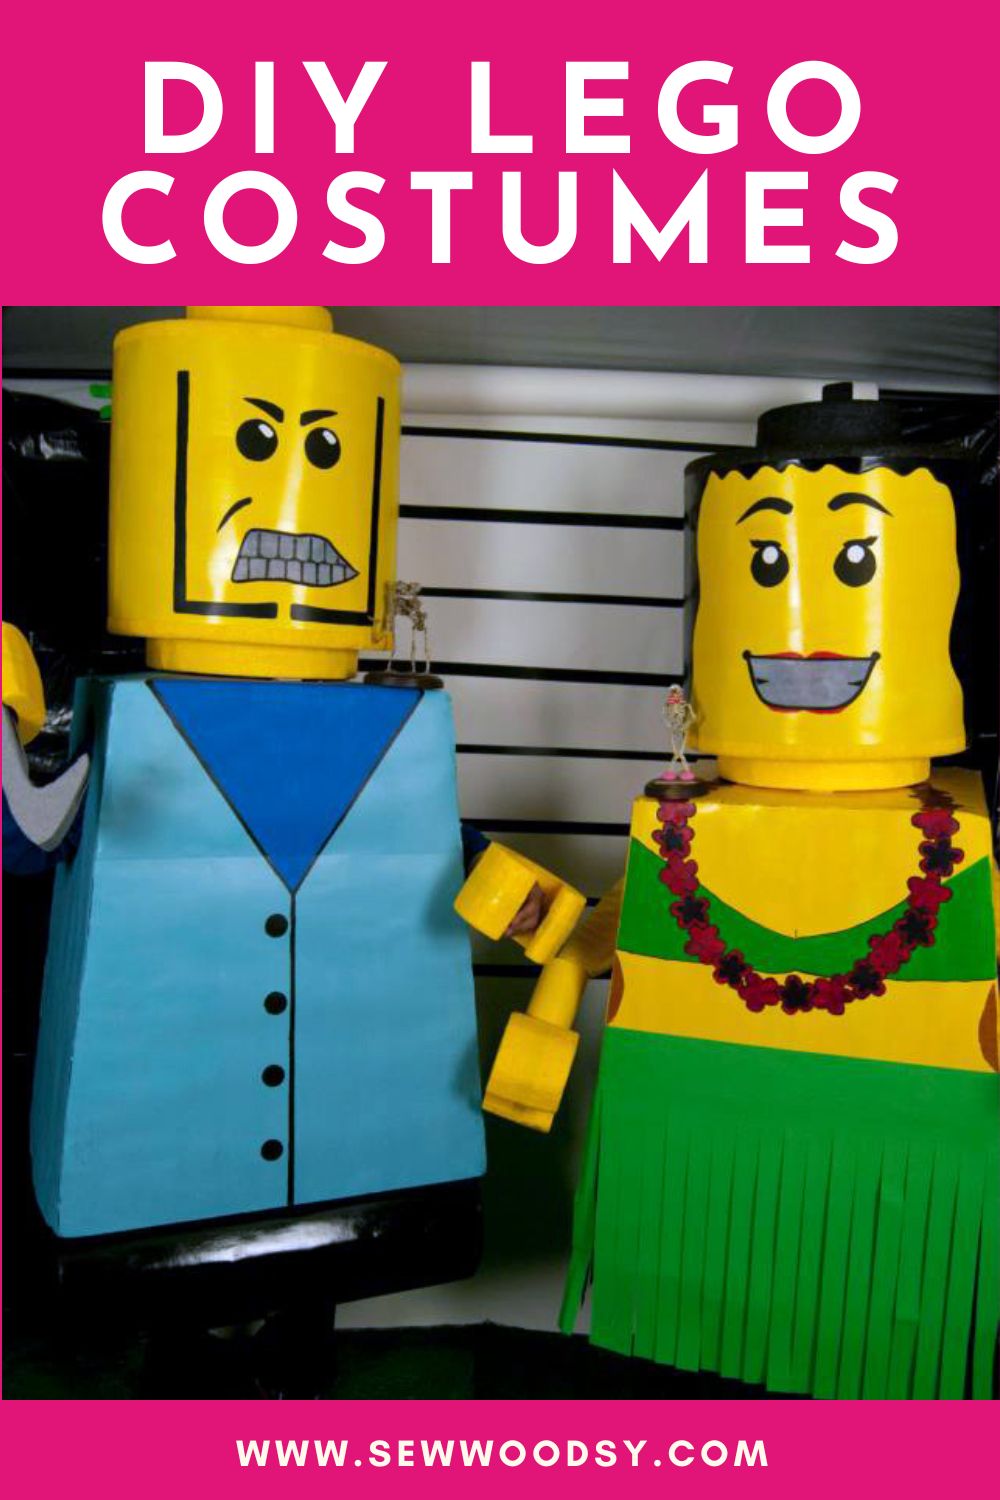
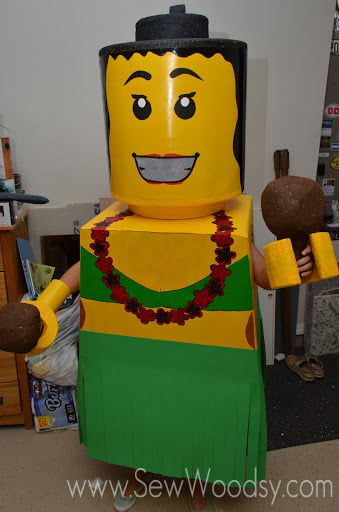
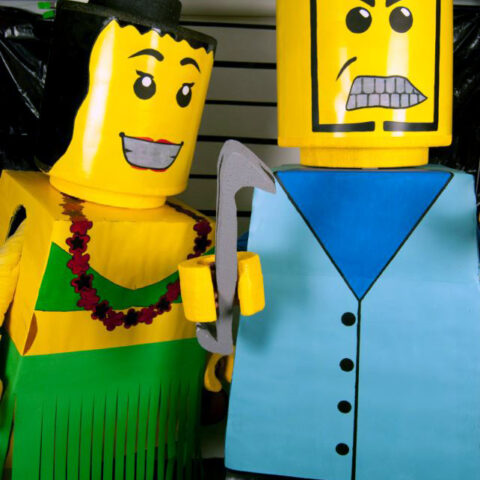
Hula LEGO Costume
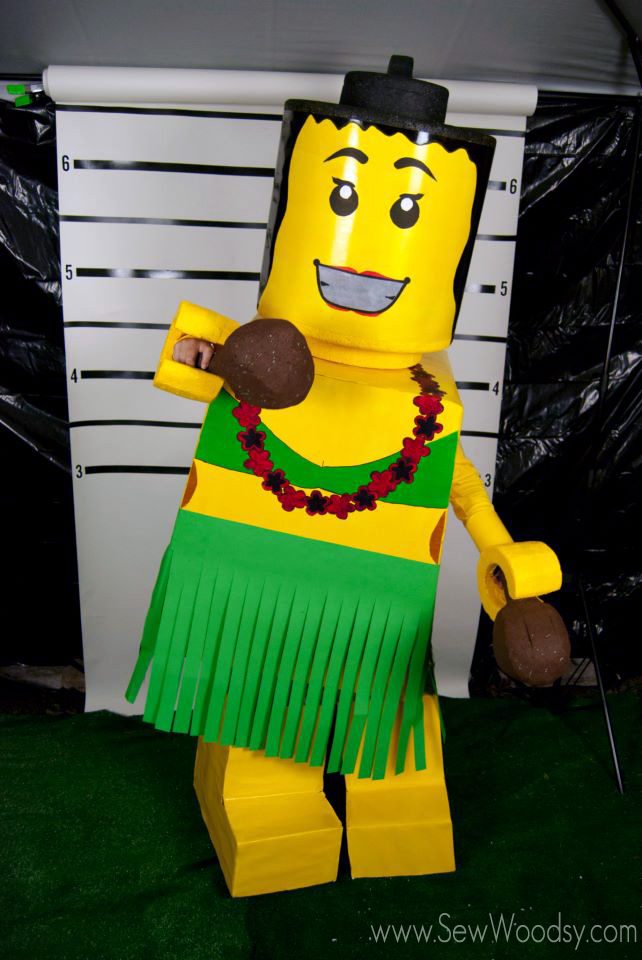
And the final product.
EPIC! I loved my Hula LEGO Costume.
Mean Face LEGO Costume
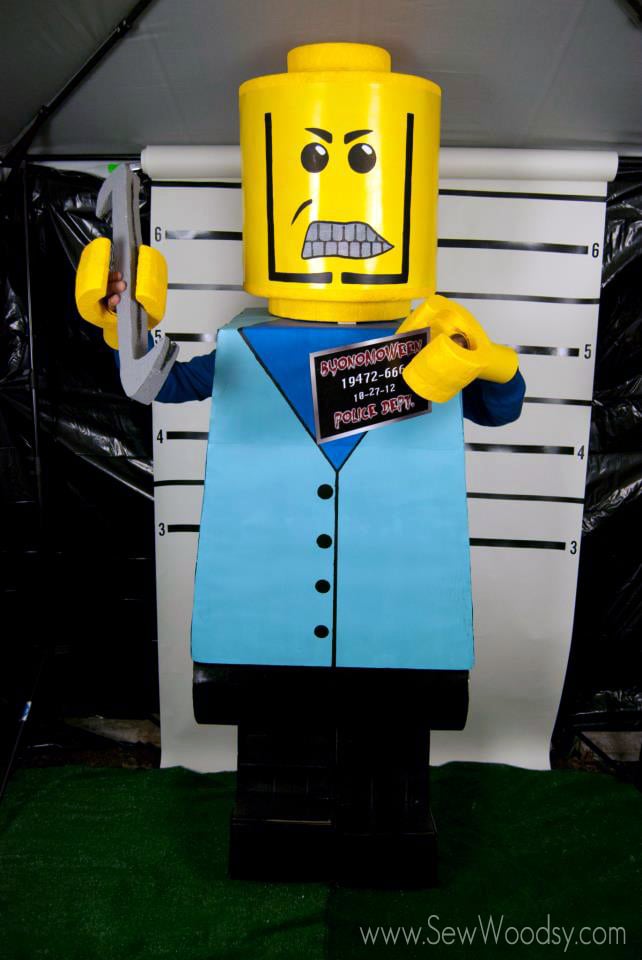
Jon’s mean face LEGO costume was a hit.
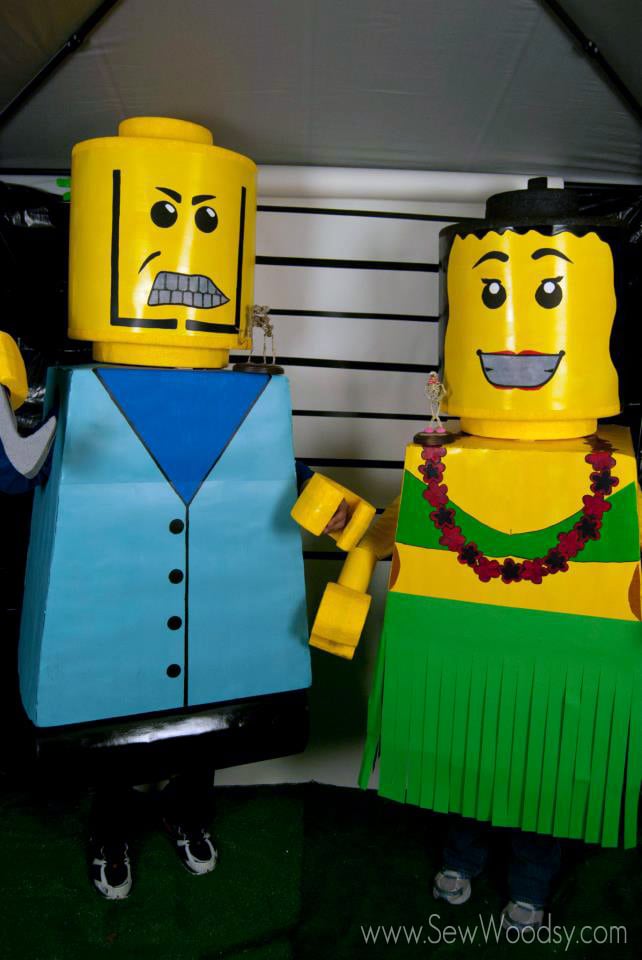
All of our friends were amazed and no one could tell who was inside the costumes. It took us 20+ minutes to get dressed into our costumes. Had we had extra time we could have done a test run. This photo was taken at the end of the night and at that point we decided to remove our feet. All of our final photos were taken by Christy Buonomo Photography. She also has a pretty cool blog where she mainly shares Halloween tutorials and other artsy photos she’s done, head on over and check out here blog Through My Looking Glass.
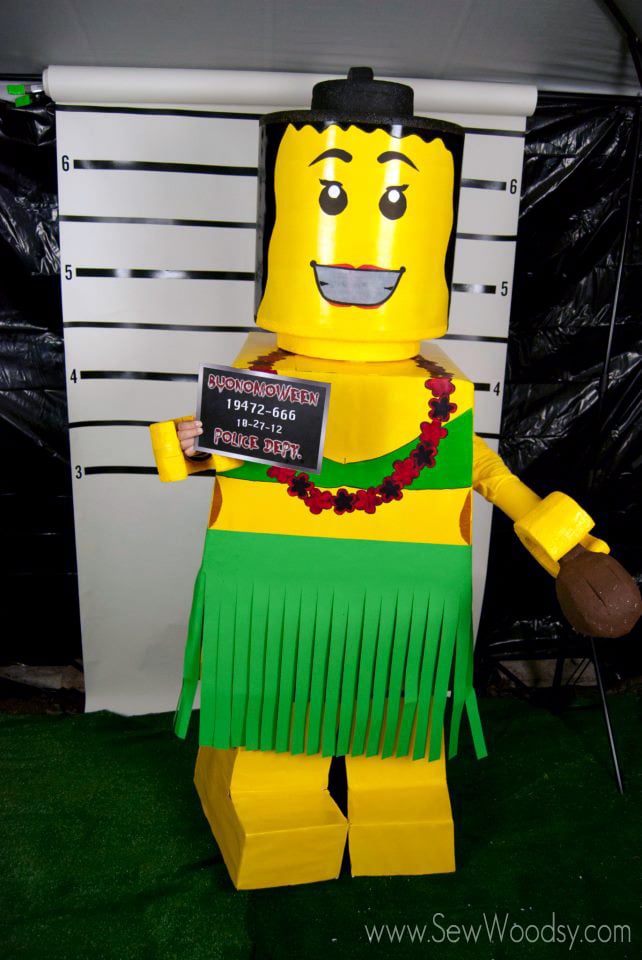
I loved how my costume turned out including my maracas. Even though everyone thought I was carrying around chicken drumsticks! I loved how my skirt actually moved!
I dyed a white long sleeve shirt from Walmart with Yellow dye. It blended in perfect to the costume! Best of all I was able to wear it after Halloween!
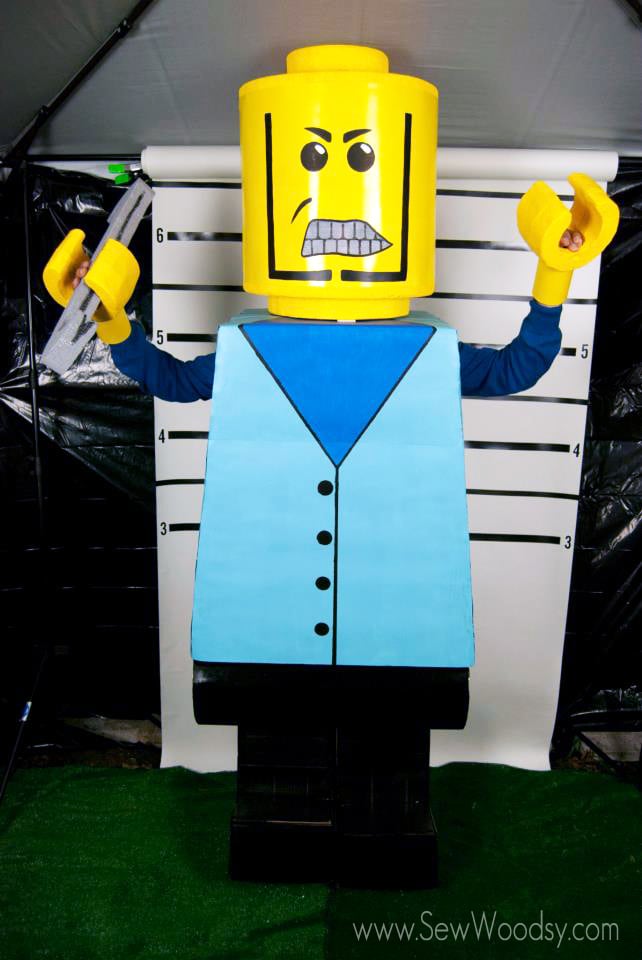
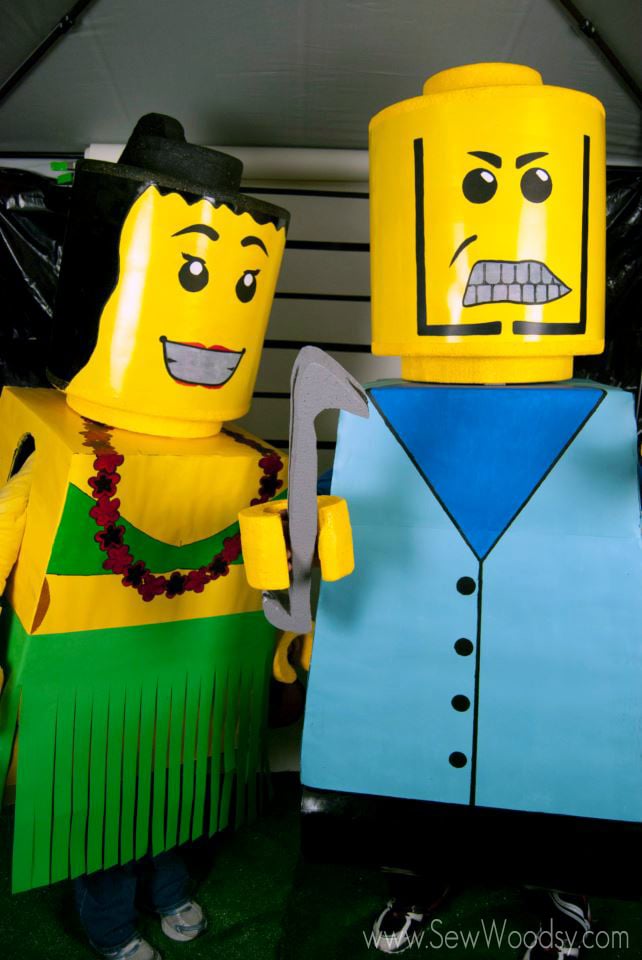
And Jon’s costume was super scary because of that face! Our friend set up a photo booth like we were in jail. It was so difficult for us to get under the tent to take photos!
Here is both of us sans feet crammed into the tent with our trophies on our shoulders!
I leave you with scary LEGO face. I’m not sure if it was the face or the fact that the costume was over 7 foot tall that made it scary. On Halloween night as we passed out candy to the kids Jon dressed up in his LEGO costume and stood at the foot of the driveway. He made kids SCREAM… and cry. And some may have thrown their princess wands on the ground and ran away. Who would have thought a 7 foot tall LEGO that came to life would scare so many kids! Even the smarty-pants teenagers were screaming like little girls. It was hilarious to say the least.
I can honestly say, I don’t think we will ever make costumes that out top these ones. They were a labor of love and came out amazing! If you have any questions feel free to leave them in the comments below or email us.
Tips & Tricks
Here are all the tips and tricks we have when making a LEGO costume.
- Boxes – To keep the cost down of the costume trying looking at your local grocery store or whole sale club for free boxes. If not, you can always buy boxes, but the cost of the costume will go up.
- Cutting Foam – We found using a meat carving knife was easiest to cut the foam!
- Weigh Down the Foam – Use weights to weigh down the top of the glued together foam over night to ensure that they stuck together.
- Paint – We used acrylic paints we had at home. We painted the poster board yellow for the heads and part of the body. Spray paint isn’t a good option as it can streak and is hard to maintain a perfect stream of paint. If you can find yellow poster-board you can purchase it already colored–just know it might be more expensive. Depending on your design you will need to paint on the face, clothing, and any accessories.
- Cutting – Make sure you get all of your cutting done first before painting. Trust me… the last thing you want is foam dust on your freshly painted costume.
- Sharpie Marker – We found a black sharpie marker worked perfectly to draw the thinner details including the lines for the hair.
Love all things LEGO?
Since making these costumes and having kids we have shared our love for LEGO’s with them! If your planning a trip to Florida and want to learn all about LEGOLAND you can find more here:
If you make a DIY LEGO Costume, I would be honored and love for you to take the time to leave a star rating and comment! I spend hours developing and testing these projects, and always love to hear feedback and user experience!
Don’t forget to FOLLOW ME on Facebook, Pinterest, and Instagram, and subscribe to my email list!
How to Make a LEGO Costume
DIY Lego Costumes
Learn how to create my eye-catching and budget-friendly DIY LEGO costumes with step-by-step instructions and creative tips in this fun and informative guide all for under $30!
Materials
- Cardboard
- Foam
- Black Gaffers Tape
- Gorilla Glue
- Hot Glue
- Poster Tube
- Yellow Paint
- Yellow Poster Board
- White Poster Board
- Black Sharpie
- Black Paint
- Blue Paint
- Pink Paint
- White Spray Paint
Tools
- Yard Stick Ruler
- Hand Saw
- Weights
- Meat Carving Knife
- Metal Mesh
- Hot Glue Gun
Instructions
How to Build the LEGO Body
- First, create the base and body of the LEGO costume. Cut out cardboard for the body. Size will vary depending on the person wearing the costume. Secure the cardboard body together with black gaffers tape -- its super sticky.
- Next, we used hot glue and secured white poster board to the bodies and feet. We wanted a smooth surface and found this was the easiest way to achieve the smooth surface.
- Then, hand paint all the poster board--majority will be yellow and depending on LEGO design will depend on colors you use.
- Print out a LEGO logo to adhere to the back of the costume.
How to Build LEGO Feet
- Next, build out the feet. Build the sides of the feet out of thick foam and the fronts and backs out of cardboard. Once the feet were
secured and glue was dried we used hot glue and secured white poster board to the feet. We painted the feet the same time we painted the bodies.
DIY LEGO Costume Head
- To make the LEGO heads you will want to start by making the tops of the heads. We used heavy styrofoam for the tops of the head. You will need one larger piece and 3 smaller per LEGO costume.
- We secured the smaller foam tops on the larger and then painted them yellow and black where appropriate for mine and all yellow for the classic LEGO. Jon used 2-inch strips of cardboard to hold up the tops.
- Spray paint the screens white that you will need for the mouths. This needs to be done prior to placing on the heads! You will want to also pre-cut the mouths out before placing the poster board on the heads. Once the screens are dry adhere screens to the mouth.
- Next, it’s time to secure the yellow poster board on to the lego heads using hot glue. Make sure to place the seams in the back. Then, you will need to either freehand draw the faces on using a pencil OR you can cut faces and apply vinyl to the cardboard.
- Feel free to pencil on the faces and then began painting. Jon used a black sharpie marker to draw the thinner details including the lines for the hair.
How to Make LEGO Hands for Costume
- Next, carve out the hands. The hands were created by layering
multiple pieces of foam together with the thicker purple foam. We
placed weights on top of the glued together foam over night to ensure
that they stuck together. Check out the picture above to reference the
layers of foam we glued together prior to cutting out the hands. - We cut “c’s” out of the hands and then began cutting the holes where we would put our actual hands through. We used a large cardboard tube as our guide to cut the holes out for the hands. You will want to use Gorilla Glue to secure the foam together.
How to make a Paper Grass Hula Skirt
- While my husband worked on the details of the faces I made my grass hula skirt out of a few pieces of green poster board from the dollar store. I believe 3 to be exact. I cut the skirt fringes 1-inch a part and left a few inches on the top.
How to make Foam Maracas
- Glue a few pieces of leftover foam together, freehand drew the maracas on to the foam. Carved out as much as possible of the foam using the electric carving knife.
- If you have access to a drill press, add a sanding pad to it and begin to run the foam around the edge of the sanding pads to get them to be as round as possible.
Notes
- Boxes - To keep the cost down of the costume trying looking at your local grocery store or whole sale club for free boxes. If not, you can always buy boxes, but the cost of the costume will go up.
- Cutting Foam - We found using a meat carving knife was easiest to cut the foam!
- Weigh Down the Foam - Use weights to weigh down the top of the glued together foam over night to ensure that they stuck together.
- Paint - We used acrylic paints we had at home. We painted the poster board yellow for the heads and part of the body. Spray paint isn't a good option as it can streak and is hard to maintain a perfect stream of paint. If you can find yellow poster-board you can purchase it already colored--just know it might be more expensive. Depending on your design you will need to paint on the face, clothing, and any accessories.
- Cutting - Make sure you get all of your cutting done first before painting. Trust me… the last thing you want is foam dust on your freshly painted costume.
- Sharpie Marker - We found a black sharpie marker worked perfectly to draw the thinner details including the lines for the hair.
Recommended Products
As an Amazon Associate and member of other affiliate programs, I earn from qualifying purchases.